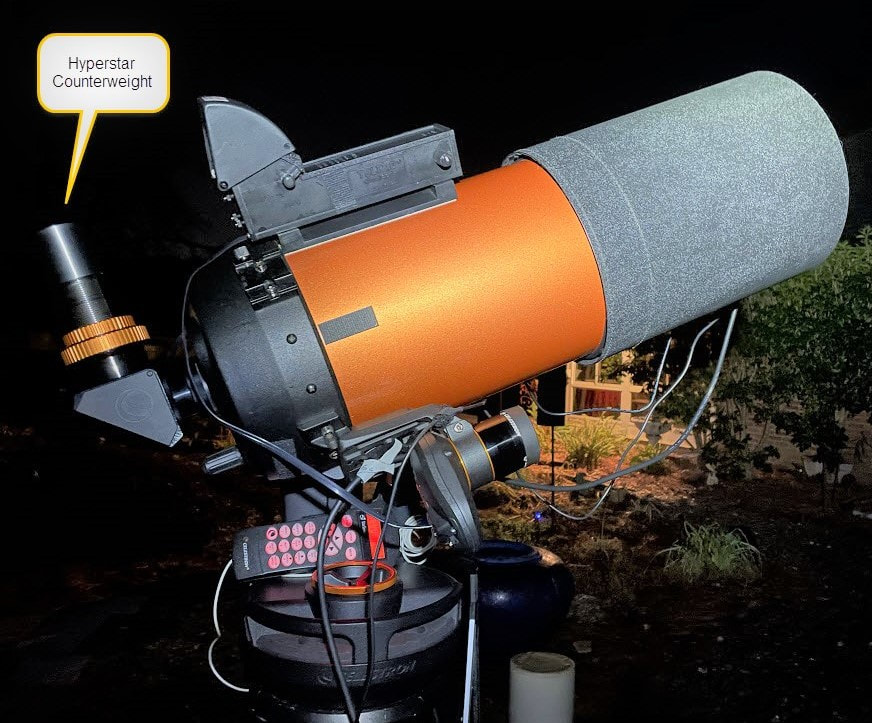
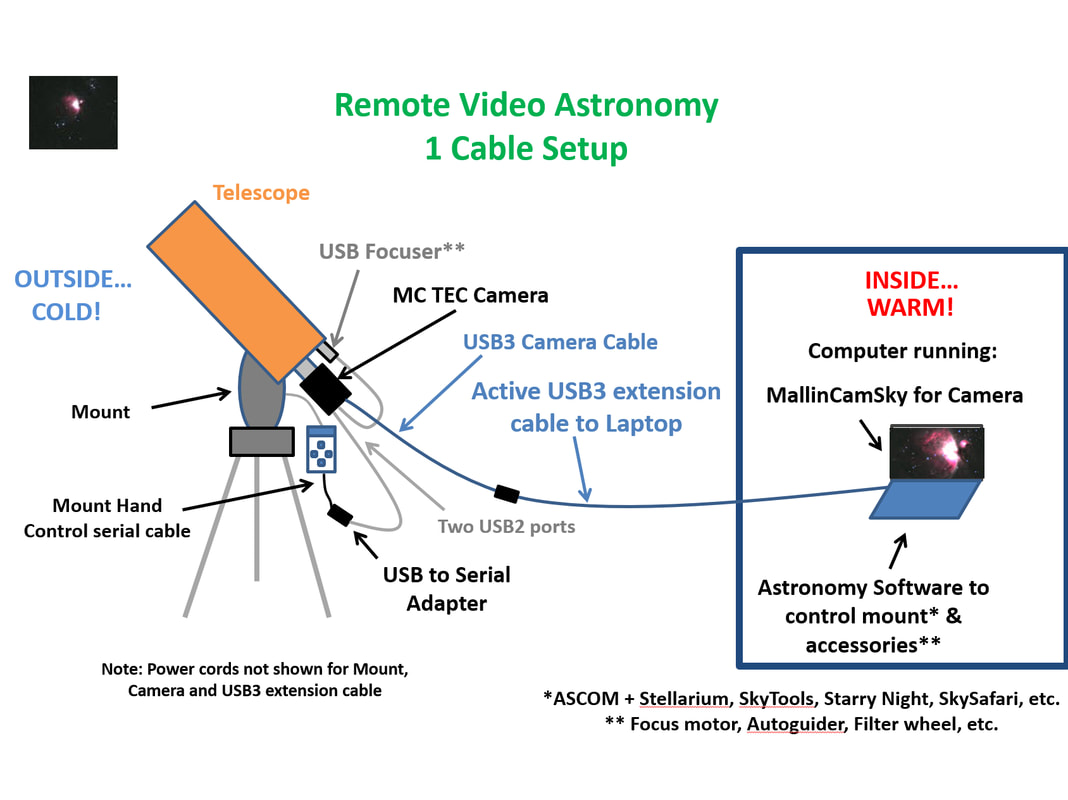
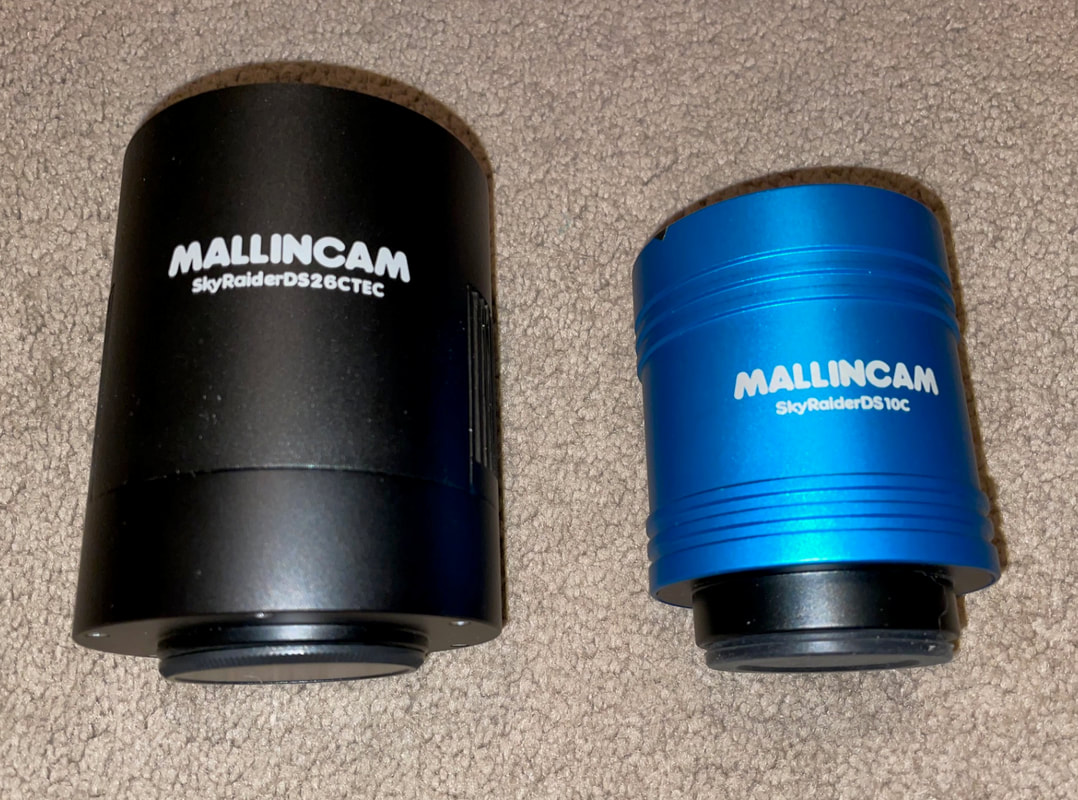
I have been pleased with the results of using the new MallinCam DS8300cTEC on my RASA8 at f/2. It provides very good resolution due to its small pixel size of 2.9x2.9 microns – smaller than the pixels of both the DS26cTEC and DS10cTEC. Typically, smaller pixels may mean less sensitivity. Since I primarily pursue live video astronomy, sensitivity is important for keeping the exposure times short. So far, it seems to have really good sensitivity for its smaller pixel size.
Here are the specs of their CMOS sensor and pixel size (and max gain):
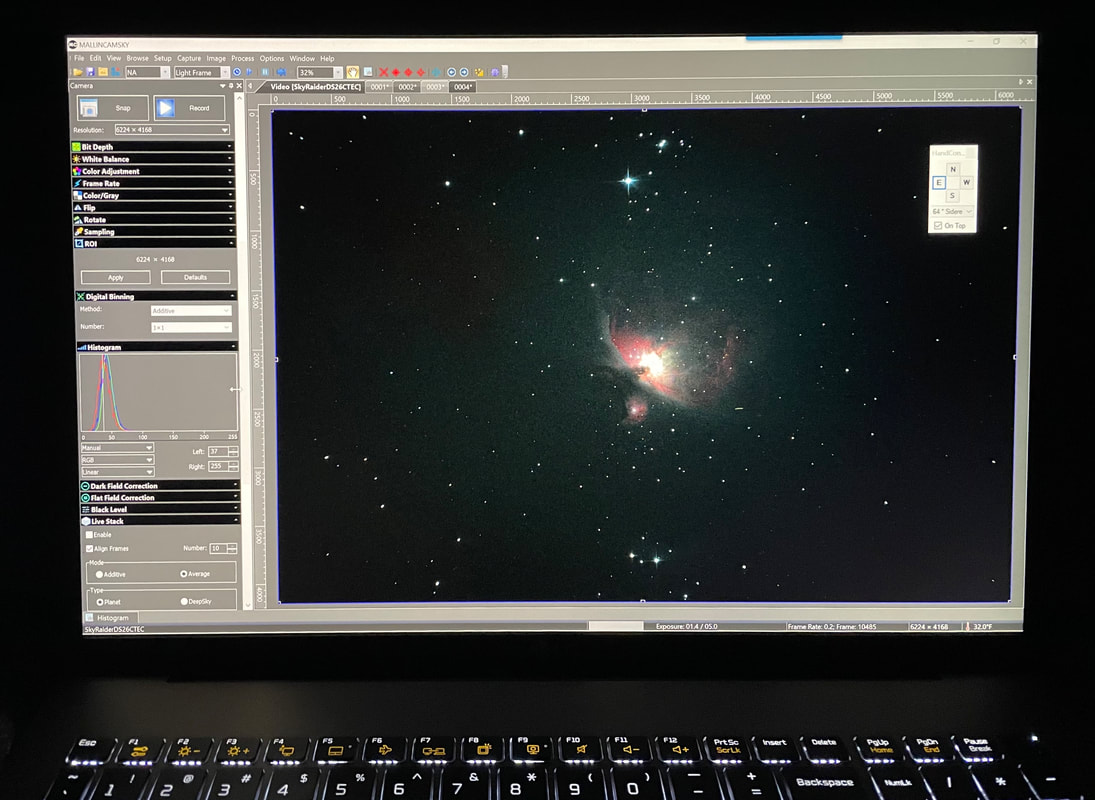
DS26cTEC: pixel size 3.76x3.76 microns, 28.3mm Diagonal Sensor, 6224x4168 (100 max gain)
DS10cTEC: pixel size 4.63x4.63 microns, 21.63mm Diagonal Sensor, 4096x2160 (160 max gain)
DS8300cTEC: pixel size 2.9x2.9 microns, 12.84mm Diagonal Sensor, 3840x2160 (150 max gain)
Due to its resolution and bigger sensor and field of view, the DS26cTEC is great for large Nebula such as the North America Nebula (NGC7000). What advantage, if any, might the DS8300cTEC provide? How does the DS10cTEC fit in between? It would seem the smaller pixel size of the DS8300cTEC should provide better resolution. However, the diagonal size of its sensor is much smaller than the others, which means it would have a smaller Field of View.
All three of these cameras come with the MallinCam TEC cooling chamber, which when turned on, essentially eliminates the need for darks for live video astronomy.
Some benefits can be subjective depending upon its use. The larger the pixel size, the more photons it can gather which results in better sensitivity (but with less resolution). Even though the DS8300cTEC has the smallest pixel size, it seems to be pretty sensitive. Stacking is noticeably slower when using the DS26cTEC full field of view at bin 1 which makes it less suitable for stacking during live viewing. However, its stacking can be noticeably sped up for live viewing when using the Region of Interest (ROI) setting since you are only stacking a portion of the sensor’s pixels.
I should note that I have seen very good results of each of these cameras when used for astrophotography by others producing amazing images through post processing. One day I hope to learn the techniques and skills required to do this as well. My current pursuit is still near real time viewing sessions with these cameras. I want to see images of deep sky objects as quickly as reasonably possible with color and details that far exceed visual viewing. I am interested in the wow factor of just seeing them and it does not matter to me if they are a little “grainy” or over exposed if it means I can see the target fairly well within 5-10 minutes of slewing my telescope to the target. This time restraint also includes a technique I have developed using a short period of “live” post processing after snaping an image, as long as it does not exceed about 2 additional minutes.
After all these considerations, I decided the best way to sort through this for my use would be to compare each of these cameras under live viewing conditions at bin 1 using the same field of view (and thus each processing the same amount of photons). Then differences in stacking time and in resolution, sensitivity and exposure settings is more readily apparent when the same FOV is used.
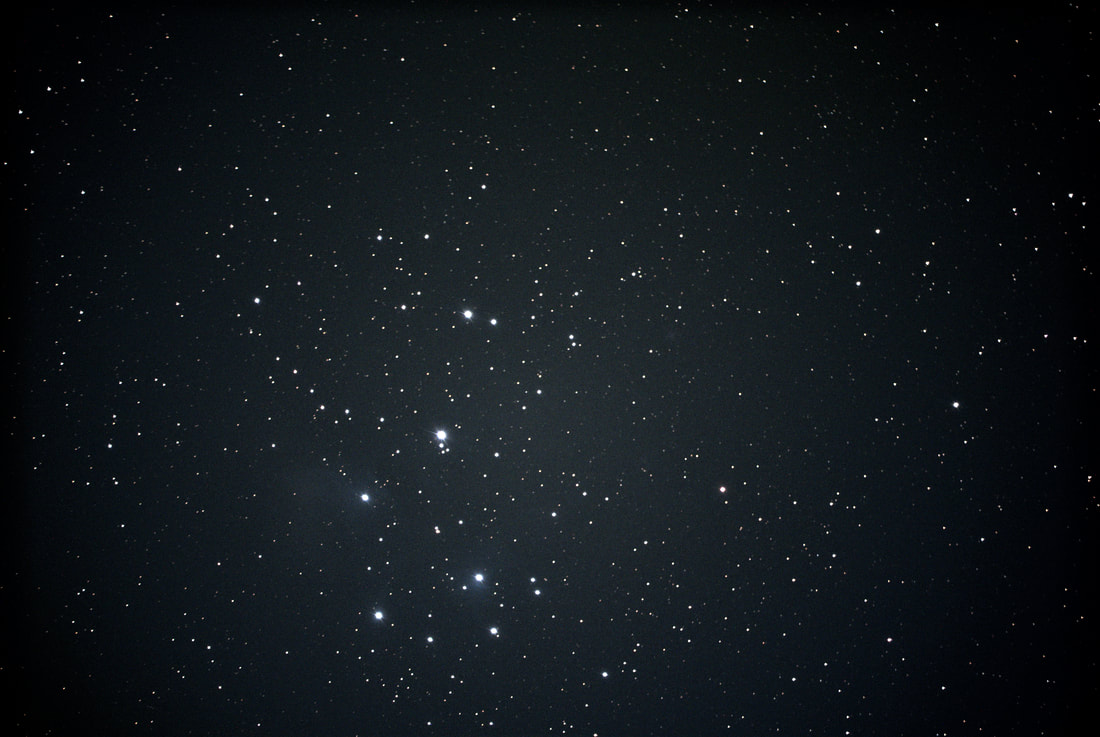
I could accomplish this by using the Region of Interest (ROI) setting to make the DS26cTEC and DS10cTEC field of view match the DS8300cTEC field of view. I picked the Pleiades (M45) as a good visual target to use for some initial tests. I found the following ROI settings for the DS26cTEC and DS10cTEC produced the same field of view as the DS8300cTEC:
DS26cTEC: 3054 x 1718 ROI
DS10cTEC: 2426 x 1364 ROI
DS8300cTEC: 3840 x 2160 native (no ROI)
I saved these ROI settings for the DS26c and DS10c so that I could easily load them as needed and reuse them in the future.
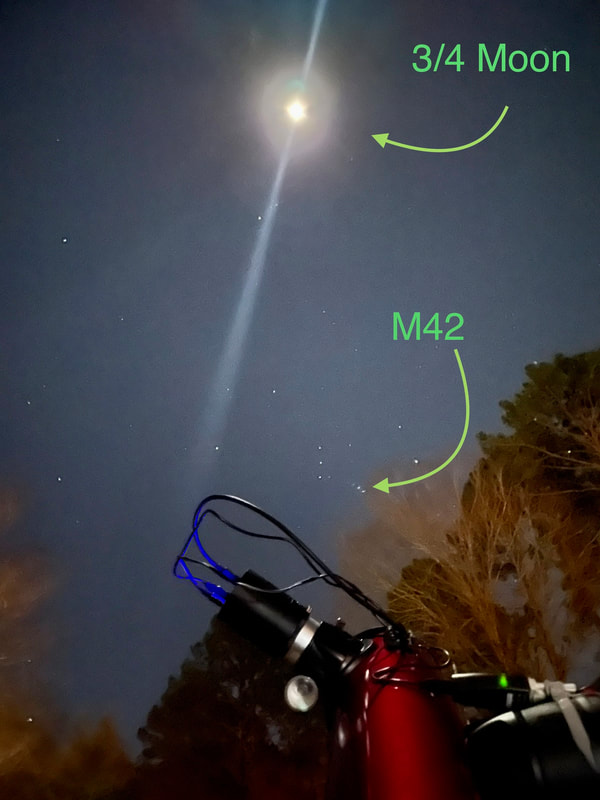
As a side note, since my backyard observatory is under Bortle 6 skies and I live in a neighborhood, I have been using the Antlia Quadband Anti-Light Pollution filter as a good general use filter and left it in place for these tests. Most of my time was spent inside (where it was warm) performing these tests using Remote Video Astronomy. I used the maximum gain setting for each of the cameras. Using a lower gain and stacking more images can provide a less grainy image, but will lengthen the total stacking time to produce the final image. So, since I am interested in seeing images quickly, for consistency I chose to test all the cameras at their maximum gain.
So, I now had an easy way of repeating viewing sessions for each of the 3 cameras using the same field of view. My next step was to then view some targets such as a Nebula or Galaxy to compare their sensitivity.
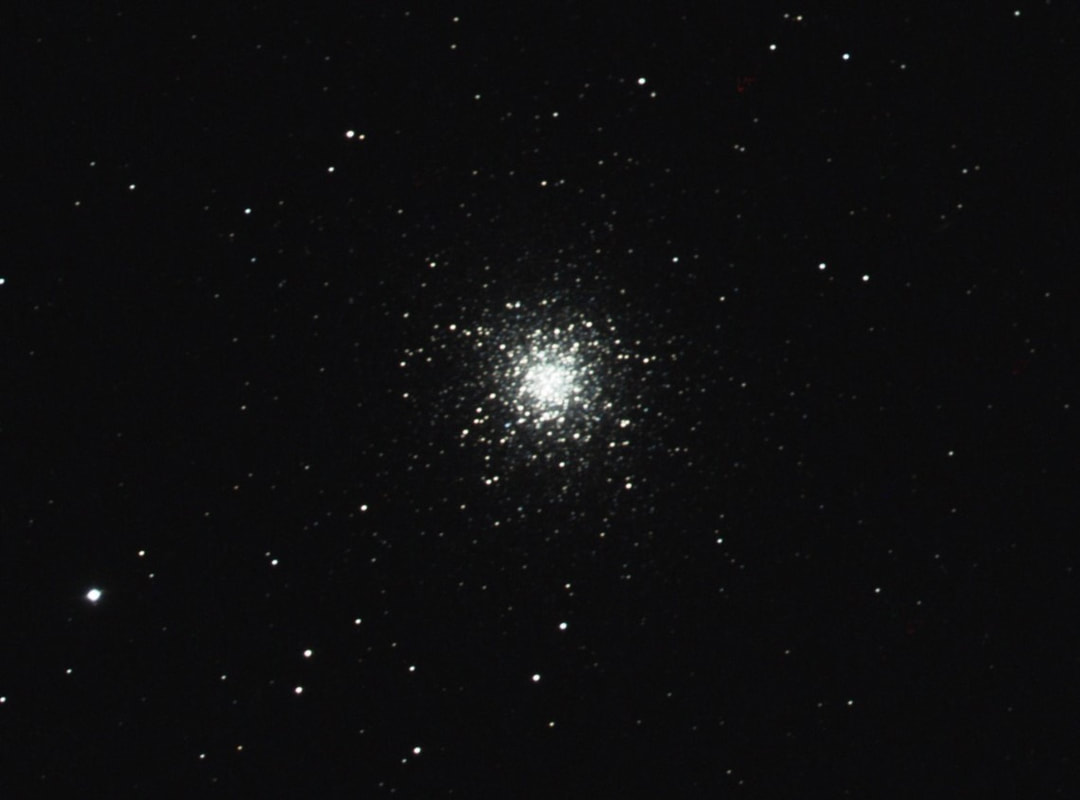
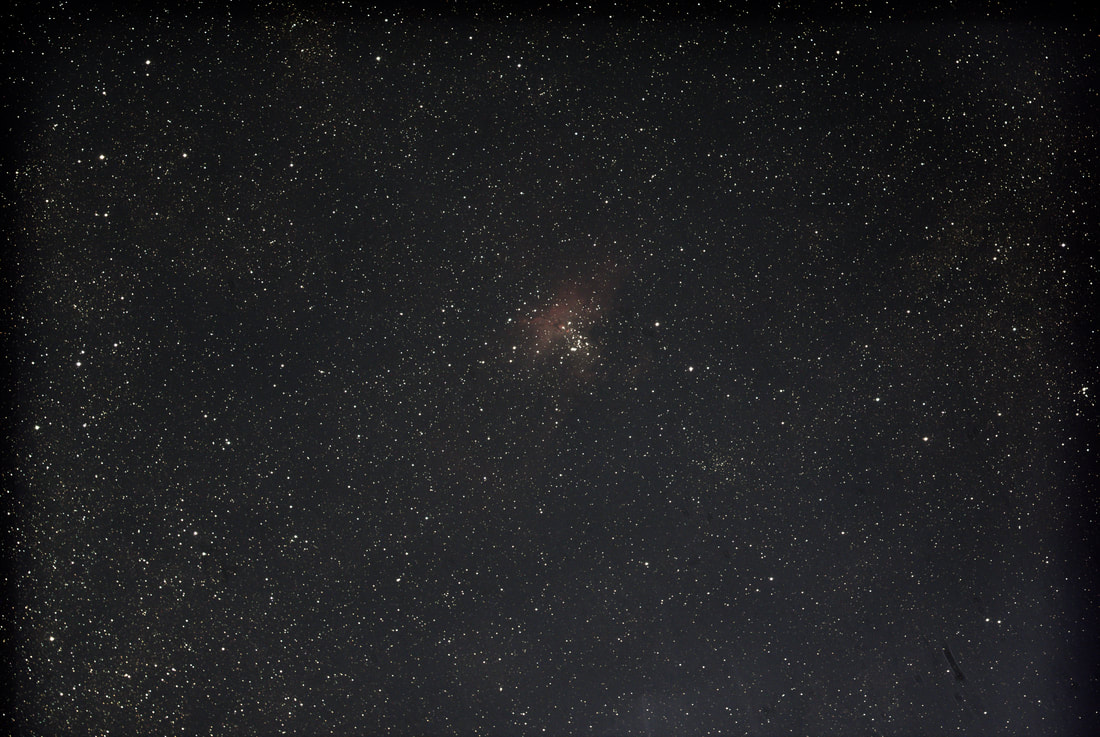
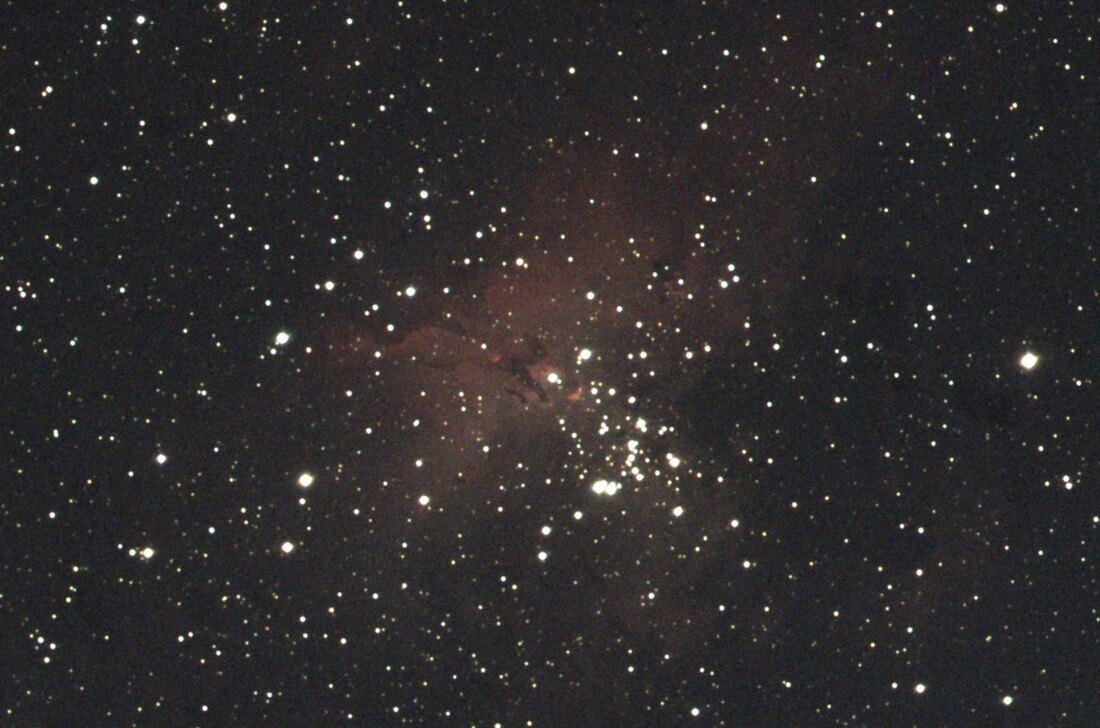
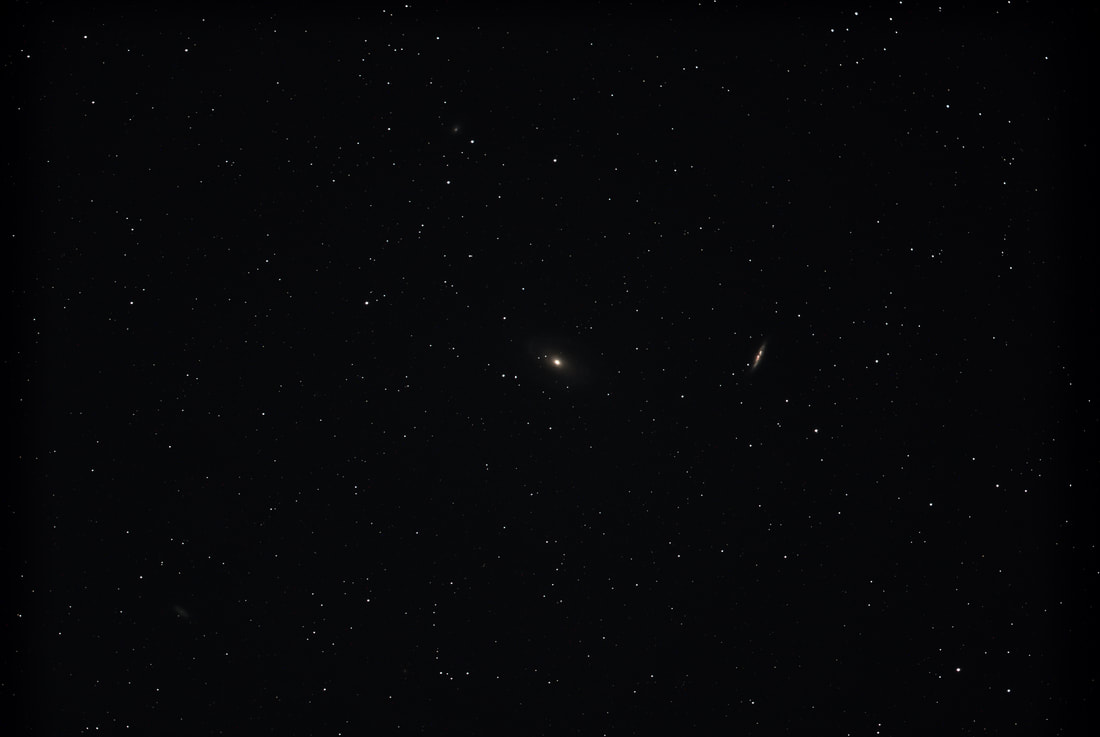
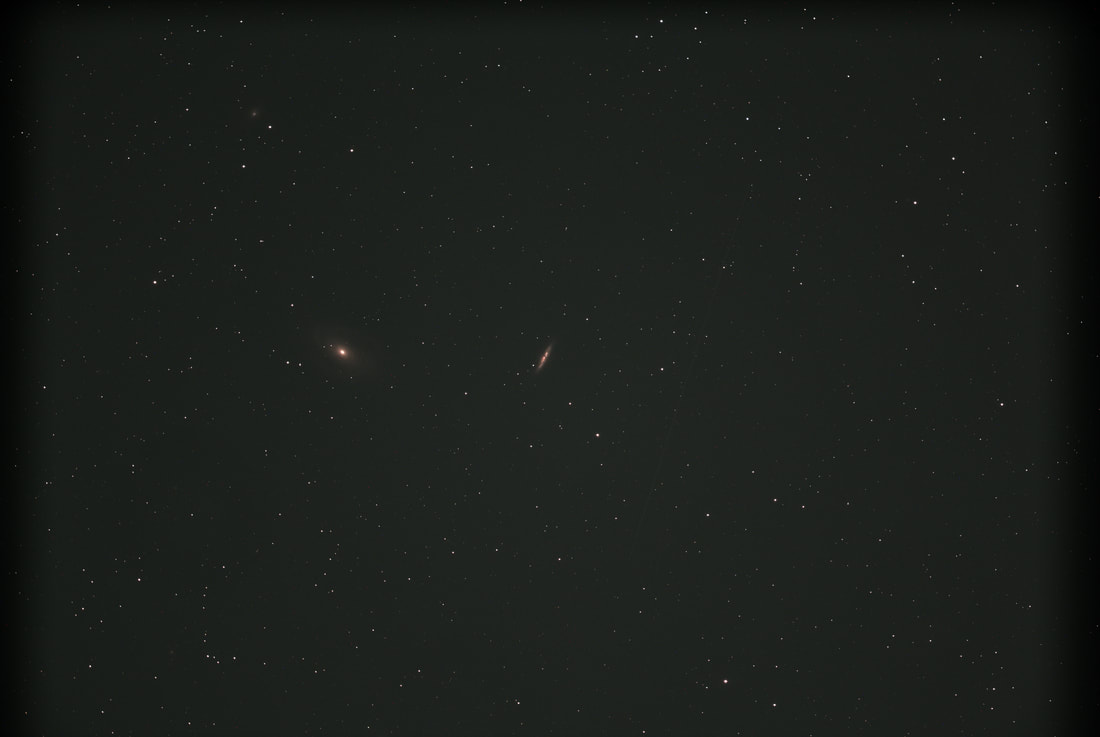
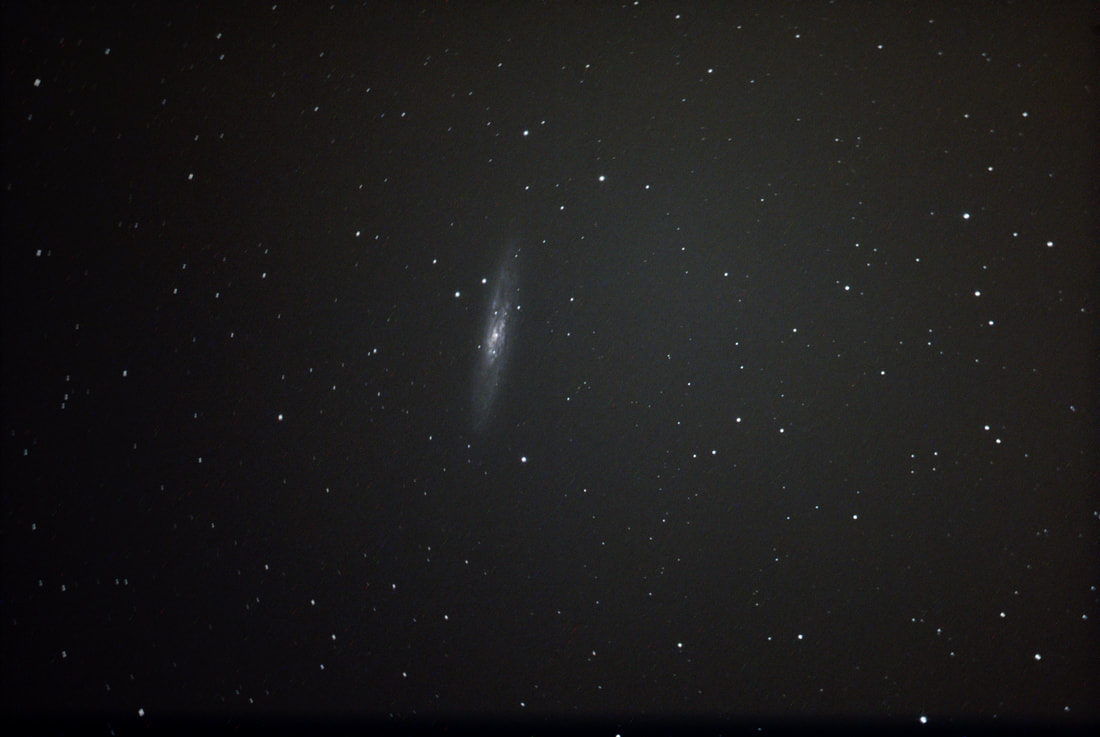
For my first test I chose a combination of the Bubble Nebula (C11) and Scorpion Cluster (M52) in the same field of view.
TEST 1. The images below are of C11 and M52 as seen by each camera’s full field of view using all their sensor pixels in order to give a visual feel of each chip’s FOV. The exposure and histogram settings and number of images stacked are also indicated.
Here are the specs of their CMOS sensor and pixel size (and max gain):
DS26cTEC: pixel size 3.76x3.76 microns, 28.3mm Diagonal Sensor, 6224x4168 (100 max gain)
DS10cTEC: pixel size 4.63x4.63 microns, 21.63mm Diagonal Sensor, 4096x2160 (160 max gain)
DS8300cTEC: pixel size 2.9x2.9 microns, 12.84mm Diagonal Sensor, 3840x2160 (150 max gain)
Due to its resolution and bigger sensor and field of view, the DS26cTEC is great for large Nebula such as the North America Nebula (NGC7000). What advantage, if any, might the DS8300cTEC provide? How does the DS10cTEC fit in between? It would seem the smaller pixel size of the DS8300cTEC should provide better resolution. However, the diagonal size of its sensor is much smaller than the others, which means it would have a smaller Field of View.
All three of these cameras come with the MallinCam TEC cooling chamber, which when turned on, essentially eliminates the need for darks for live video astronomy.
Some benefits can be subjective depending upon its use. The larger the pixel size, the more photons it can gather which results in better sensitivity (but with less resolution). Even though the DS8300cTEC has the smallest pixel size, it seems to be pretty sensitive. Stacking is noticeably slower when using the DS26cTEC full field of view at bin 1 which makes it less suitable for stacking during live viewing. However, its stacking can be noticeably sped up for live viewing when using the Region of Interest (ROI) setting since you are only stacking a portion of the sensor’s pixels.
I should note that I have seen very good results of each of these cameras when used for astrophotography by others producing amazing images through post processing. One day I hope to learn the techniques and skills required to do this as well. My current pursuit is still near real time viewing sessions with these cameras. I want to see images of deep sky objects as quickly as reasonably possible with color and details that far exceed visual viewing. I am interested in the wow factor of just seeing them and it does not matter to me if they are a little “grainy” or over exposed if it means I can see the target fairly well within 5-10 minutes of slewing my telescope to the target. This time restraint also includes a technique I have developed using a short period of “live” post processing after snaping an image, as long as it does not exceed about 2 additional minutes.
After all these considerations, I decided the best way to sort through this for my use would be to compare each of these cameras under live viewing conditions at bin 1 using the same field of view (and thus each processing the same amount of photons). Then differences in stacking time and in resolution, sensitivity and exposure settings is more readily apparent when the same FOV is used.
I could accomplish this by using the Region of Interest (ROI) setting to make the DS26cTEC and DS10cTEC field of view match the DS8300cTEC field of view. I picked the Pleiades (M45) as a good visual target to use for some initial tests. I found the following ROI settings for the DS26cTEC and DS10cTEC produced the same field of view as the DS8300cTEC:
DS26cTEC: 3054 x 1718 ROI
DS10cTEC: 2426 x 1364 ROI
DS8300cTEC: 3840 x 2160 native (no ROI)
I saved these ROI settings for the DS26c and DS10c so that I could easily load them as needed and reuse them in the future.
As a side note, since my backyard observatory is under Bortle 6 skies and I live in a neighborhood, I have been using the Antlia Quadband Anti-Light Pollution filter as a good general use filter and left it in place for these tests. Most of my time was spent inside (where it was warm) performing these tests using Remote Video Astronomy. I used the maximum gain setting for each of the cameras. Using a lower gain and stacking more images can provide a less grainy image, but will lengthen the total stacking time to produce the final image. So, since I am interested in seeing images quickly, for consistency I chose to test all the cameras at their maximum gain.
So, I now had an easy way of repeating viewing sessions for each of the 3 cameras using the same field of view. My next step was to then view some targets such as a Nebula or Galaxy to compare their sensitivity.
For my first test I chose a combination of the Bubble Nebula (C11) and Scorpion Cluster (M52) in the same field of view.
TEST 1. The images below are of C11 and M52 as seen by each camera’s full field of view using all their sensor pixels in order to give a visual feel of each chip’s FOV. The exposure and histogram settings and number of images stacked are also indicated.

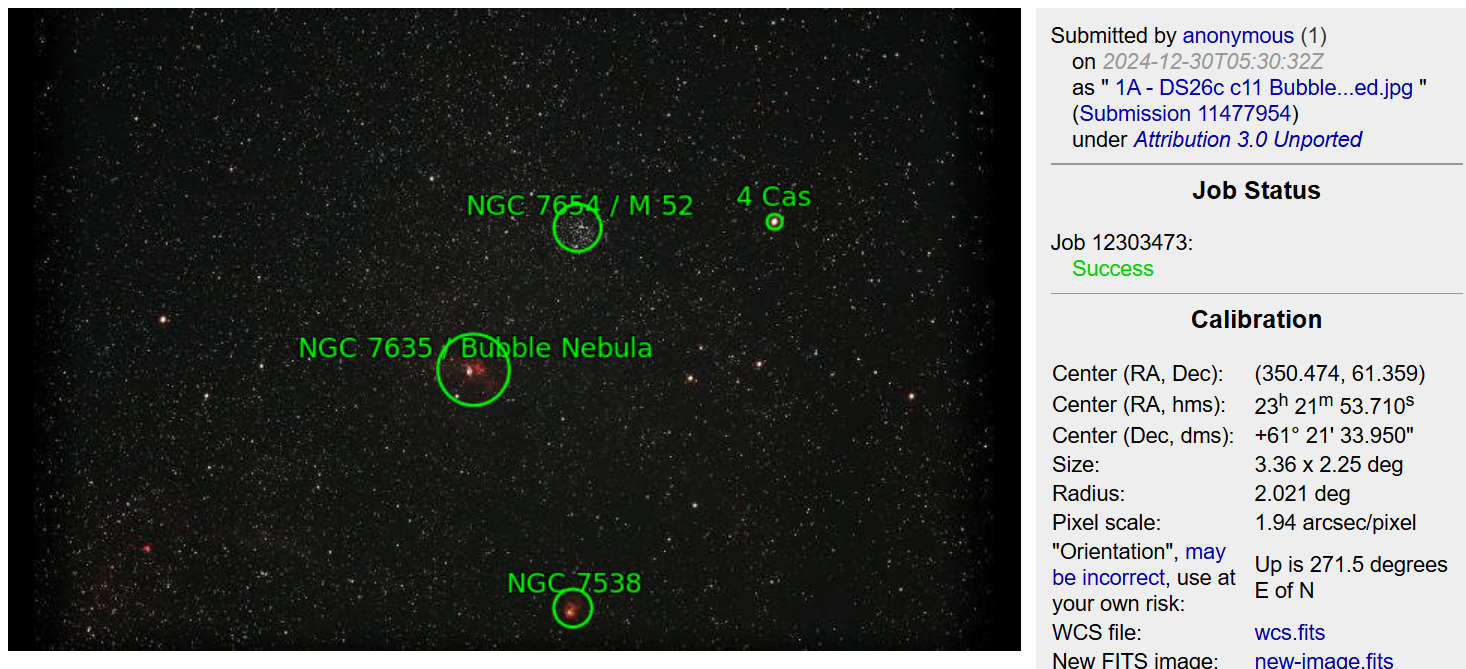
1A - DS26c c11 Bubble Nebula, m52 Scorpion Cluster FULL FOV 6224x416
5 second exposures, 10 stacked, 100 gain (max), 10-63 histogram
5 second exposures, 10 stacked, 100 gain (max), 10-63 histogram

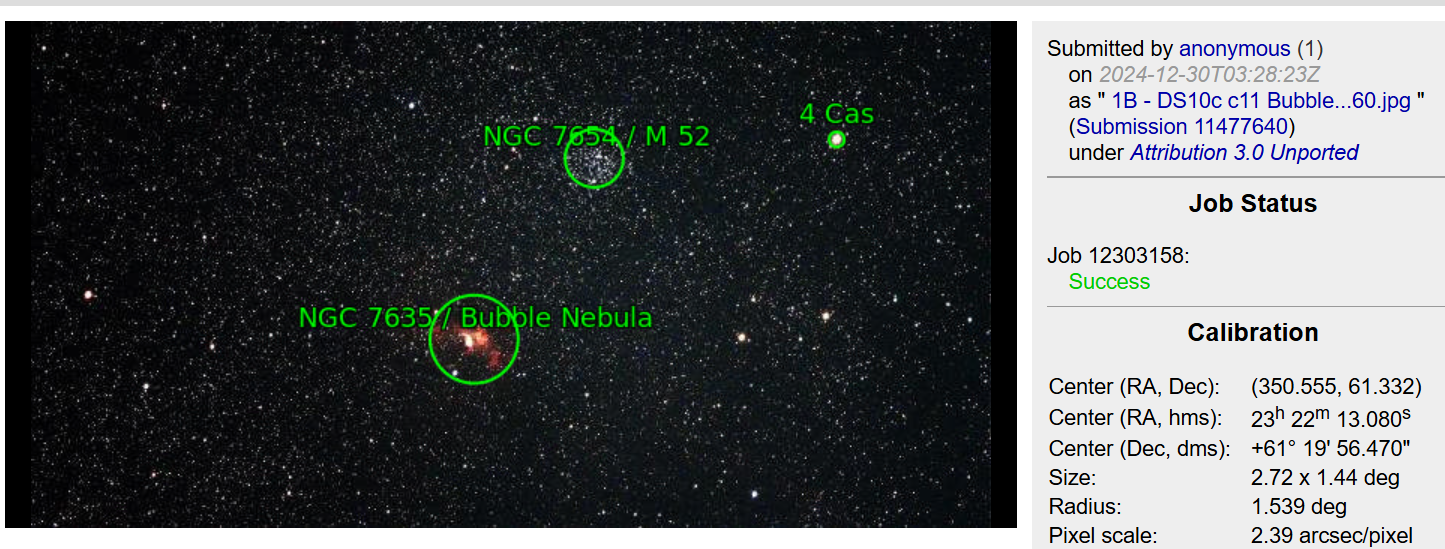
1B - DS10c c11 Bubble Nebula, m52 Scorpion Cluster FULL FOV 4096x2160
2.5 second exposures, 35 stacked, 160 gain (max), 35-180 histogram
2.5 second exposures, 35 stacked, 160 gain (max), 35-180 histogram

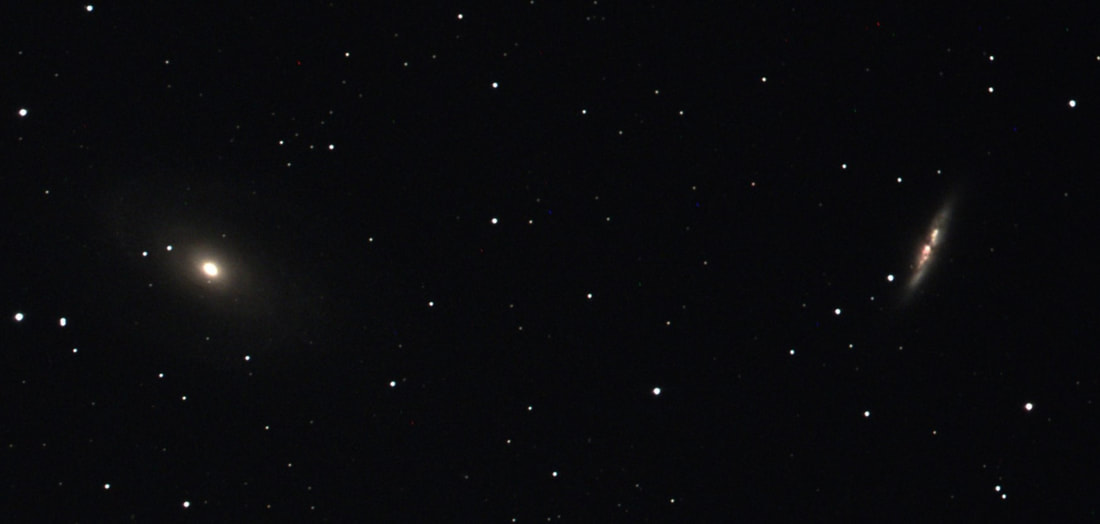
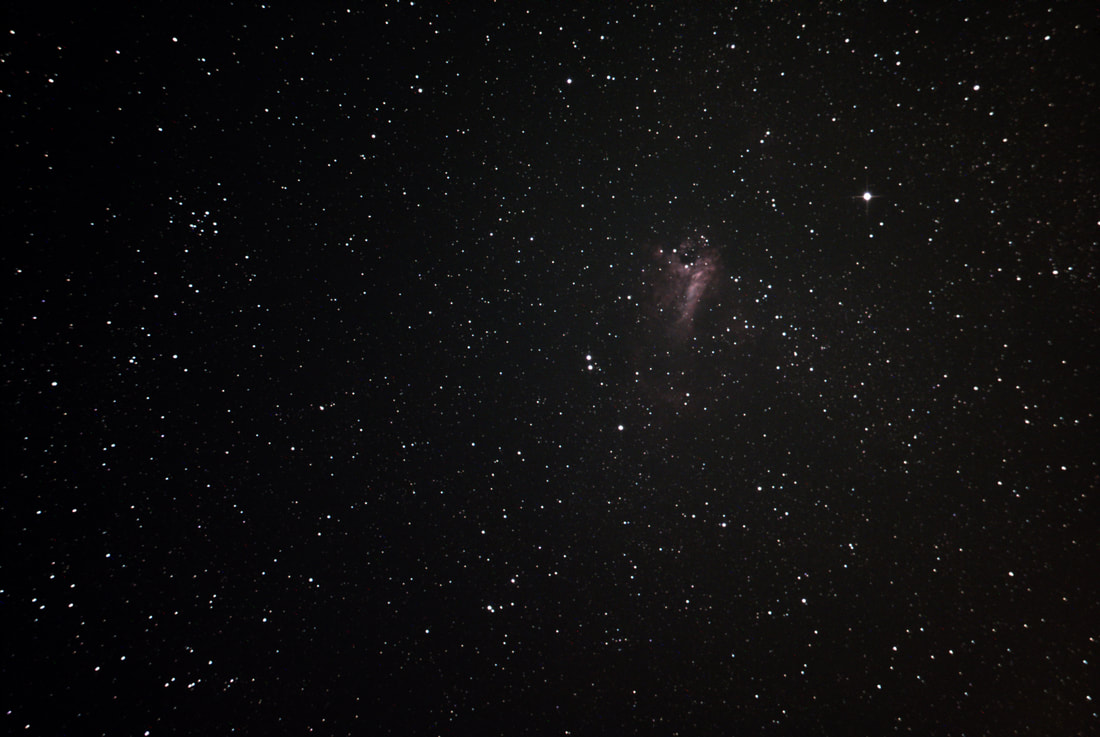
1C - DS8300c c11 Bubble Nebula, m52 Scorpion Cluster FULL FOV 3840x2160
2.5 second exposures, 35 stacked, 150 gain (max), 45-160 histogram
I uploaded each of these full field of view images to “nova.astrometry.net/upload” to obtain the image stats shown below:
2.5 second exposures, 35 stacked, 150 gain (max), 45-160 histogram
I uploaded each of these full field of view images to “nova.astrometry.net/upload” to obtain the image stats shown below:
1sA - DS26c Full FOV stats
1.94 arcsec/pixel for DS26c
1.94 arcsec/pixel for DS26c
1sB - DS10c Full FOV Stats
2.39 arcsec/pixel for DS10c
2.39 arcsec/pixel for DS10c
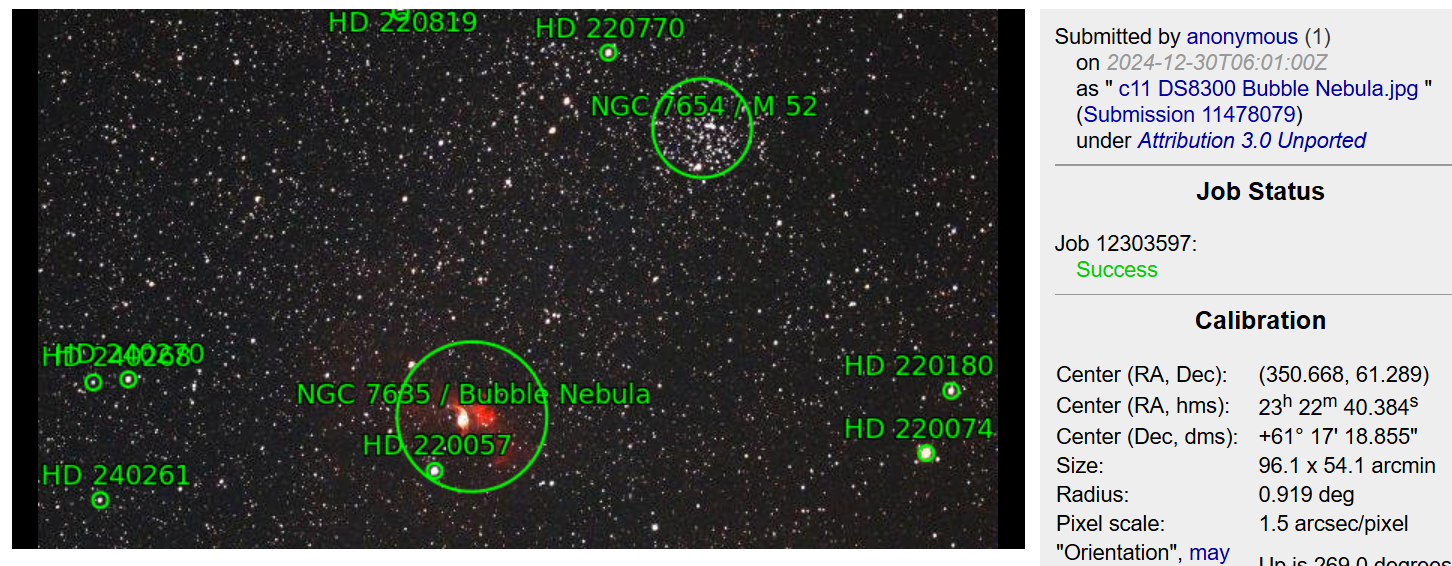
1sC - DS8300c Full FOV stats
1.50 arcsec/pixel for DS8300c
The pixel scale for each camera on the RASA8 as shown from the Calibration section are as follows:
1.94 arcsec/pixel for DS26c
2.39 arcsec/pixel for DS10c
1.50 arcsec/pixel for DS8300c
This confirms from actual use the DS8300c has the highest resolution at 1.5 arsec/pixel.
For the remaining tests, I used the previously saved Region of Interest (ROI) settings for the DS26c and the DS10c that produce the same field of view as the DS8300c full field of view as follows:
DS26c: ROI= 3054x1718 used to match DS8300c full FOV
DS10c: ROI= 2426x1364 used to match DS8300c full FOV
DS8300c: 3840x2160 full FOV (no ROI used)
Using these ROI camera settings to produce similar images would indicate a measurement of its sensitivity when processing the same amount of photons from the same target area, given similar conditions. The test images were captured over a 5 day period with clear and cool conditions and no moon. They were captured in near real time video astronomy sessions where time to final image was less than 10 minutes after the target was centered and camera settings adjusted for the target in the field of view.
TEST 2. The following test images are comparisons of the C11 and M52 target images with all three cameras “seeing” the same field of view. Note that the DS26c exposure setting was set at 5 second exposures while the DS10c and DS8300c were 2.5 second exposures. The DS26c histogram was also set a lot more narrow than the other two.
1.50 arcsec/pixel for DS8300c
The pixel scale for each camera on the RASA8 as shown from the Calibration section are as follows:
1.94 arcsec/pixel for DS26c
2.39 arcsec/pixel for DS10c
1.50 arcsec/pixel for DS8300c
This confirms from actual use the DS8300c has the highest resolution at 1.5 arsec/pixel.
For the remaining tests, I used the previously saved Region of Interest (ROI) settings for the DS26c and the DS10c that produce the same field of view as the DS8300c full field of view as follows:
DS26c: ROI= 3054x1718 used to match DS8300c full FOV
DS10c: ROI= 2426x1364 used to match DS8300c full FOV
DS8300c: 3840x2160 full FOV (no ROI used)
Using these ROI camera settings to produce similar images would indicate a measurement of its sensitivity when processing the same amount of photons from the same target area, given similar conditions. The test images were captured over a 5 day period with clear and cool conditions and no moon. They were captured in near real time video astronomy sessions where time to final image was less than 10 minutes after the target was centered and camera settings adjusted for the target in the field of view.
TEST 2. The following test images are comparisons of the C11 and M52 target images with all three cameras “seeing” the same field of view. Note that the DS26c exposure setting was set at 5 second exposures while the DS10c and DS8300c were 2.5 second exposures. The DS26c histogram was also set a lot more narrow than the other two.

2A - DS26c c11 Bubble Nebula, m52 Scorpion Cluster
5 second exposures, 35 stacked, 100 gain (max), 10-63 histogram
5 second exposures, 35 stacked, 100 gain (max), 10-63 histogram

2B - DS10c c11 Bubble Nebula, m52 Scorpion Cluster
2.5 second exposures, 35 stacked, 160 gain (max), 35-180 histogram
2.5 second exposures, 35 stacked, 160 gain (max), 35-180 histogram

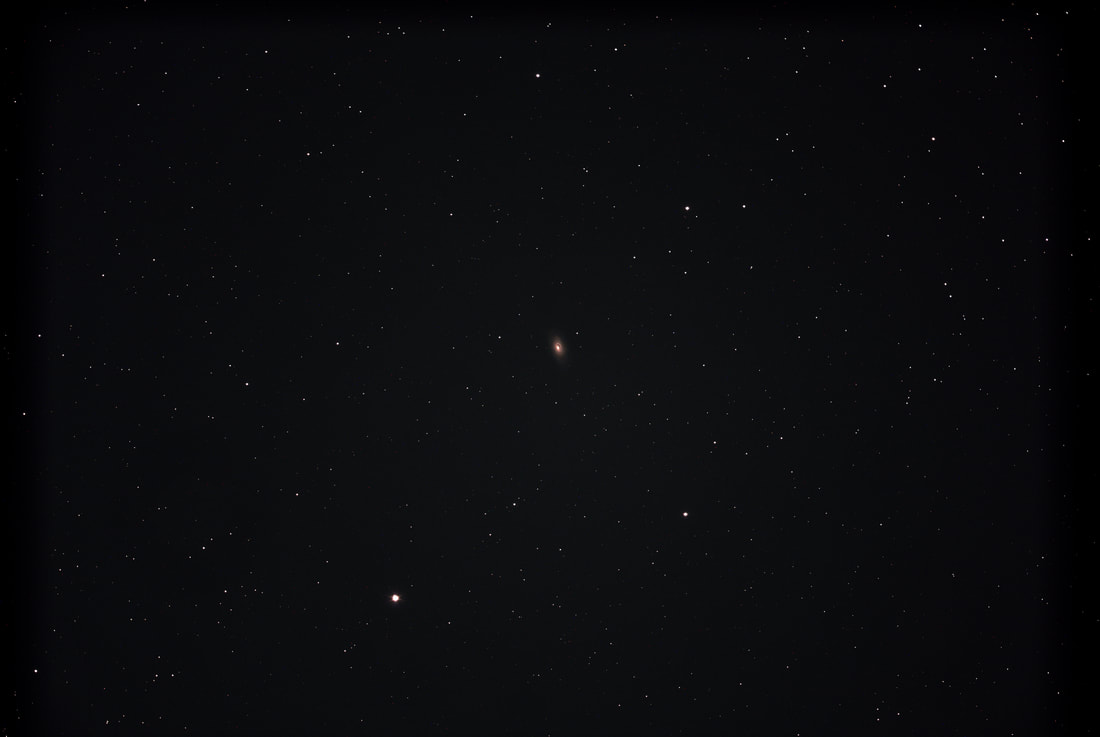
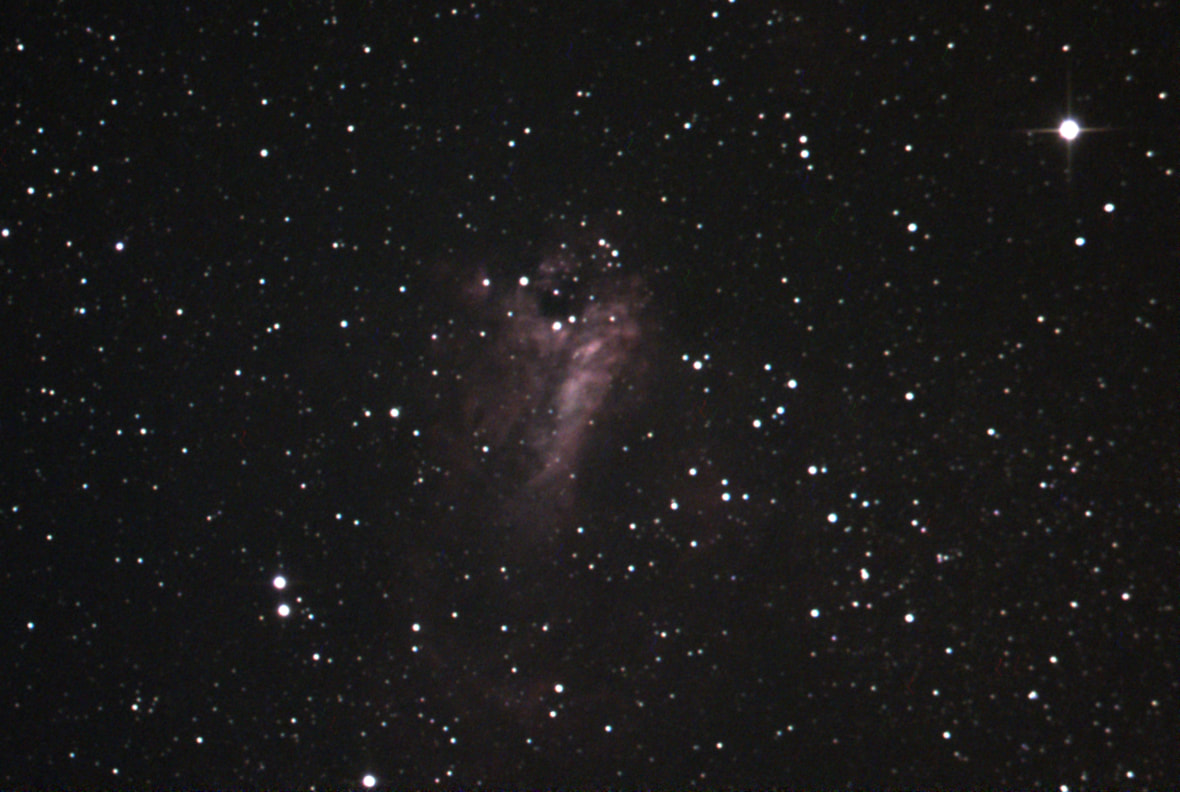
2C - DS8300 c11 Bubble Nebula, m52 Scorpion Cluster 2.5s
2.5 second exposures, 35 stacked, 150 gain (max), 45-160 histogram
As an example of my “Live” viewing time, the DS8300c image of the Bubble Nebula (C11) and the nearby cluster (M52) consists of 35 stacked 2.5 second images. The total stacked time is 2.5 seconds x 35 images = 1.5 minutes. I measured that the time to actually process and stack these 35 images was 3 minutes. During those 3 minutes I enjoyed watching the image become more clear and detailed. When it reached stacking 35 images, I clicked on snap and saved the image. I then opened the image in Microsoft Photo Viewer and adjusted the contrast, exposure, brightness and shadow controls to my liking using my Live Post Processing method in less than 2 minutes and saved the image. This gives a better visual of the data contained in the captured image. So, the total time from initiating stacking to saving the final image was about 5 minutes (3 min actual stacking time + 2 minutes live post processing). Of course, using an 8” RASA helps a lot here (but even with a f/5 80mm refractor I experience seeing images reasonably quick for live viewing).
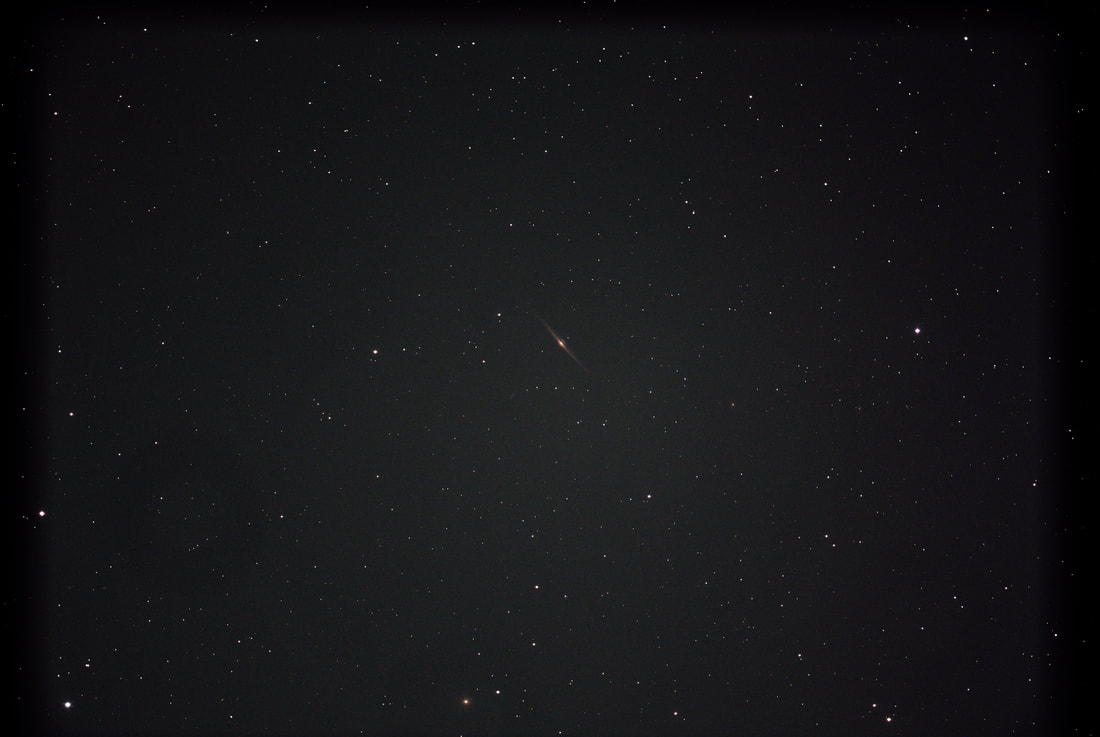
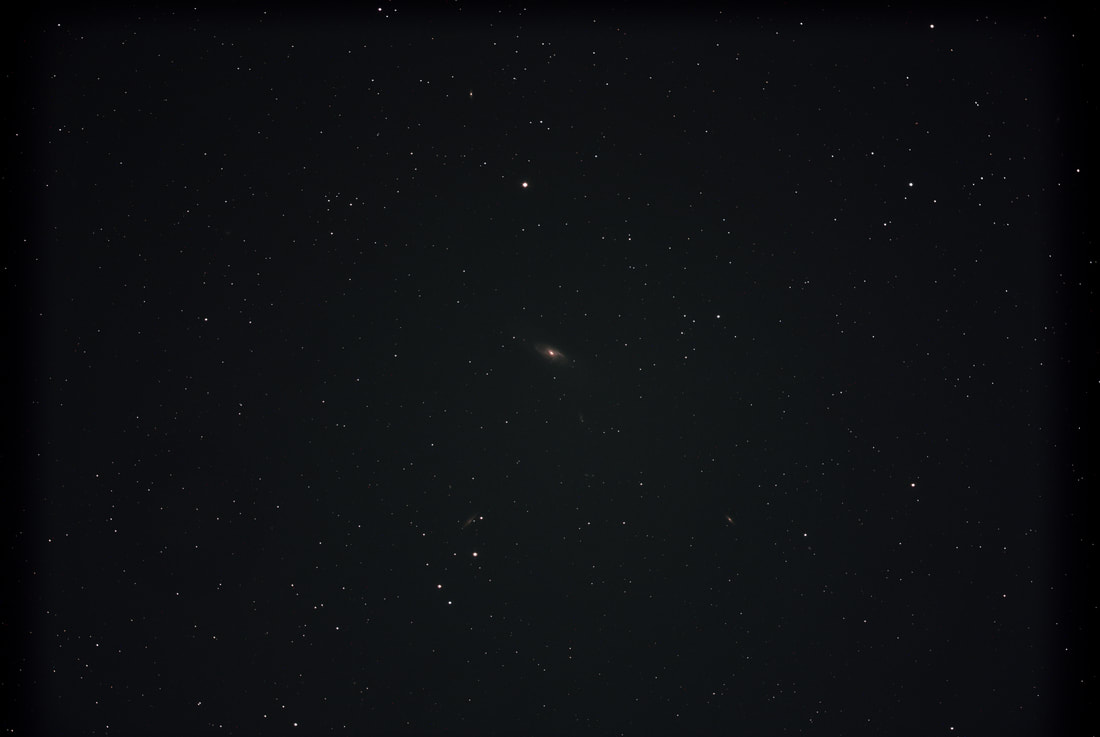
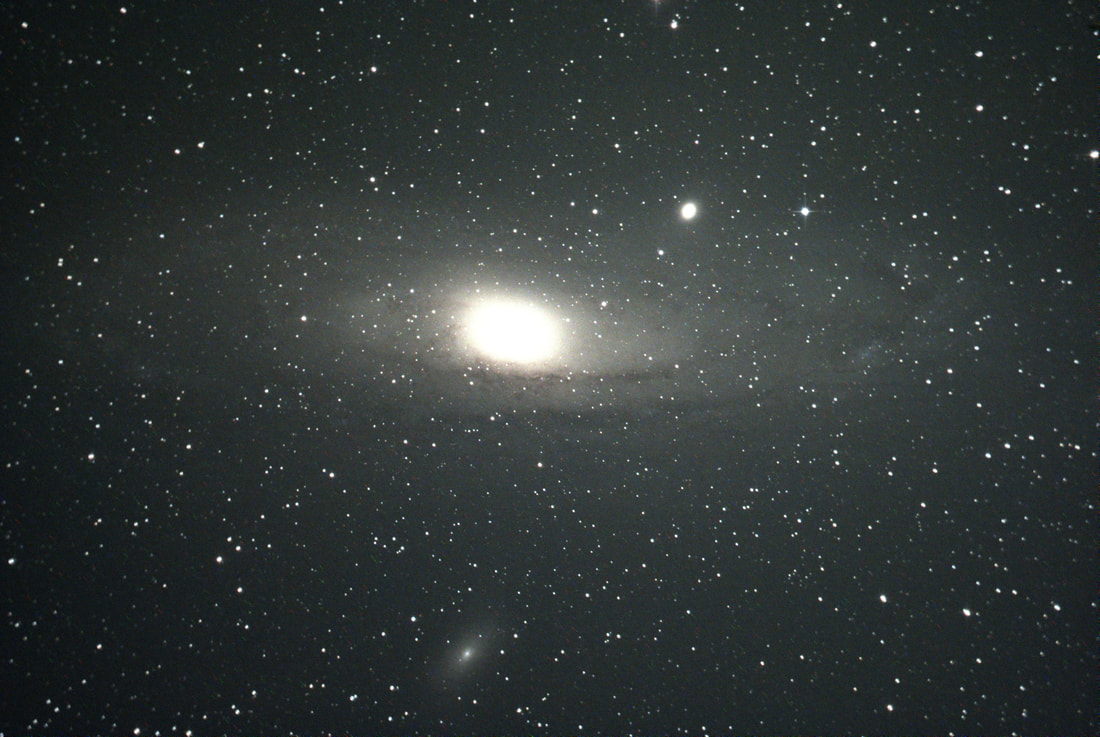
TEST 3. The next test images are comparisons of the M33 Triangulum-Pinwheel Galaxy with all three cameras “seeing” the same field of view. Again, the DS26c exposure setting was set at 5 second exposures while the DS10c and DS8300c were 2.5 second exposures to produce similar images, attesting to the similar sensitivity of the DS10c and DS8300c.
2.5 second exposures, 35 stacked, 150 gain (max), 45-160 histogram
As an example of my “Live” viewing time, the DS8300c image of the Bubble Nebula (C11) and the nearby cluster (M52) consists of 35 stacked 2.5 second images. The total stacked time is 2.5 seconds x 35 images = 1.5 minutes. I measured that the time to actually process and stack these 35 images was 3 minutes. During those 3 minutes I enjoyed watching the image become more clear and detailed. When it reached stacking 35 images, I clicked on snap and saved the image. I then opened the image in Microsoft Photo Viewer and adjusted the contrast, exposure, brightness and shadow controls to my liking using my Live Post Processing method in less than 2 minutes and saved the image. This gives a better visual of the data contained in the captured image. So, the total time from initiating stacking to saving the final image was about 5 minutes (3 min actual stacking time + 2 minutes live post processing). Of course, using an 8” RASA helps a lot here (but even with a f/5 80mm refractor I experience seeing images reasonably quick for live viewing).
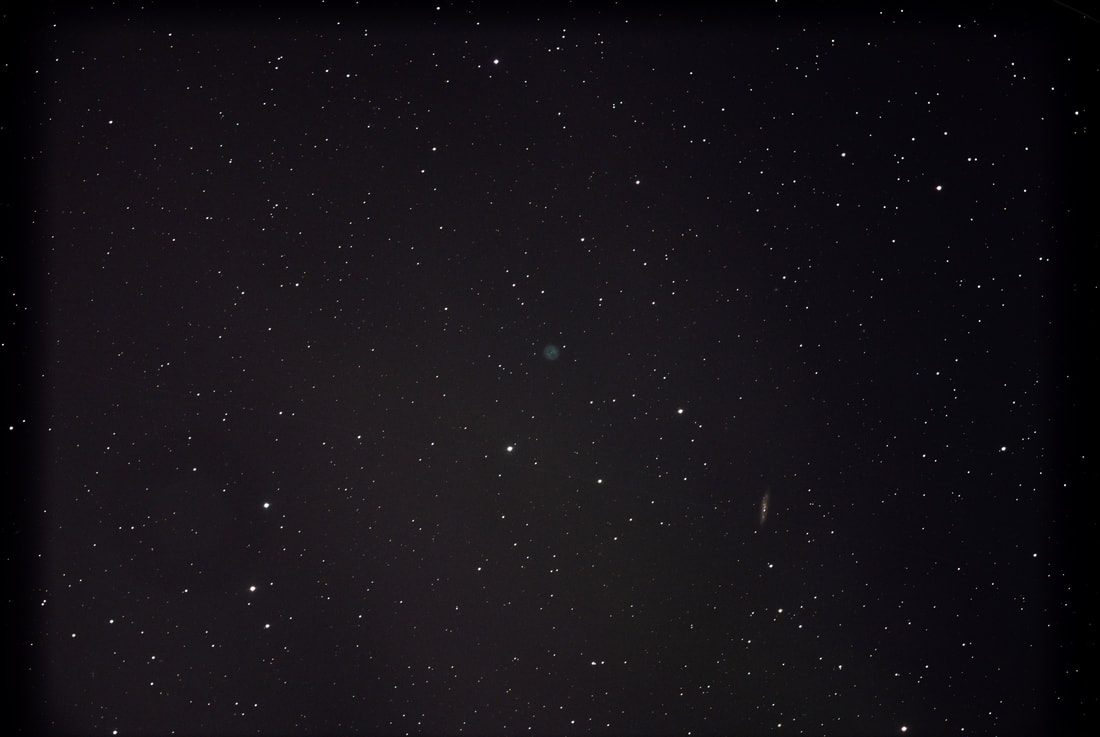
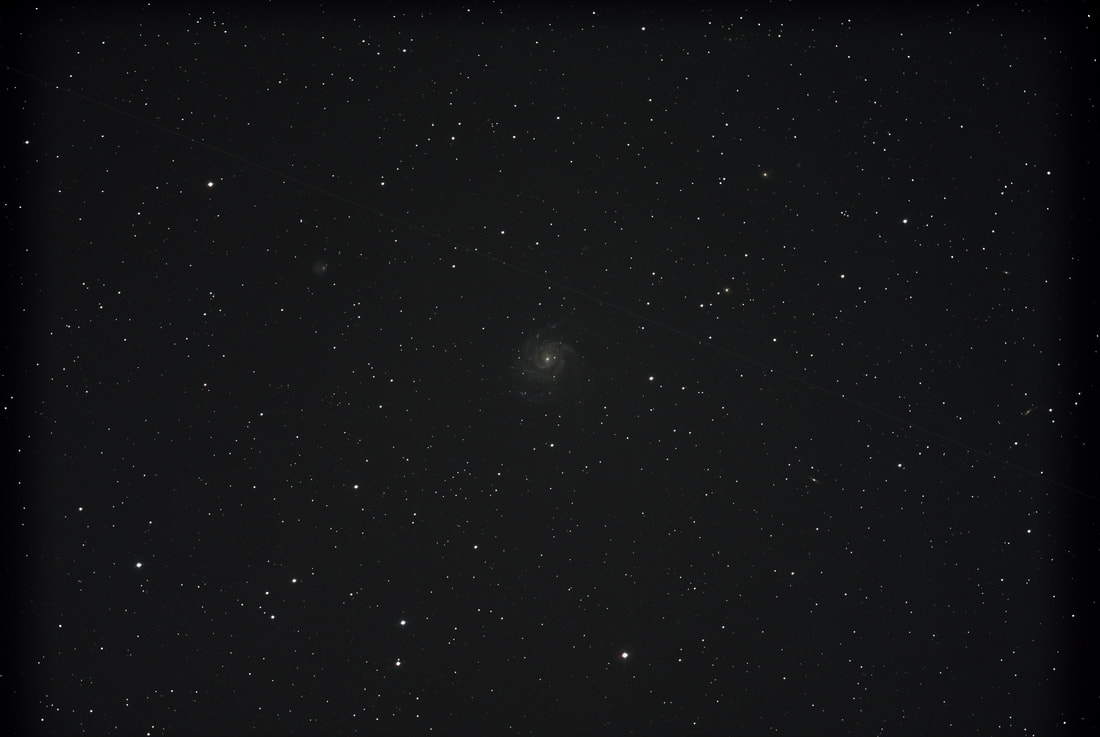
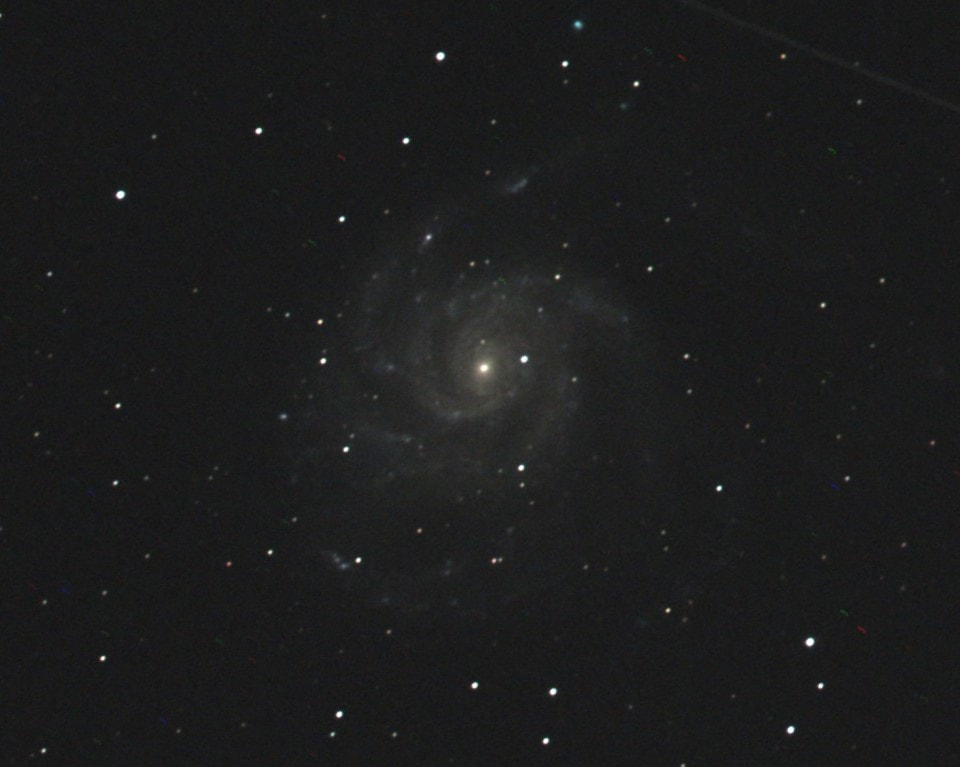
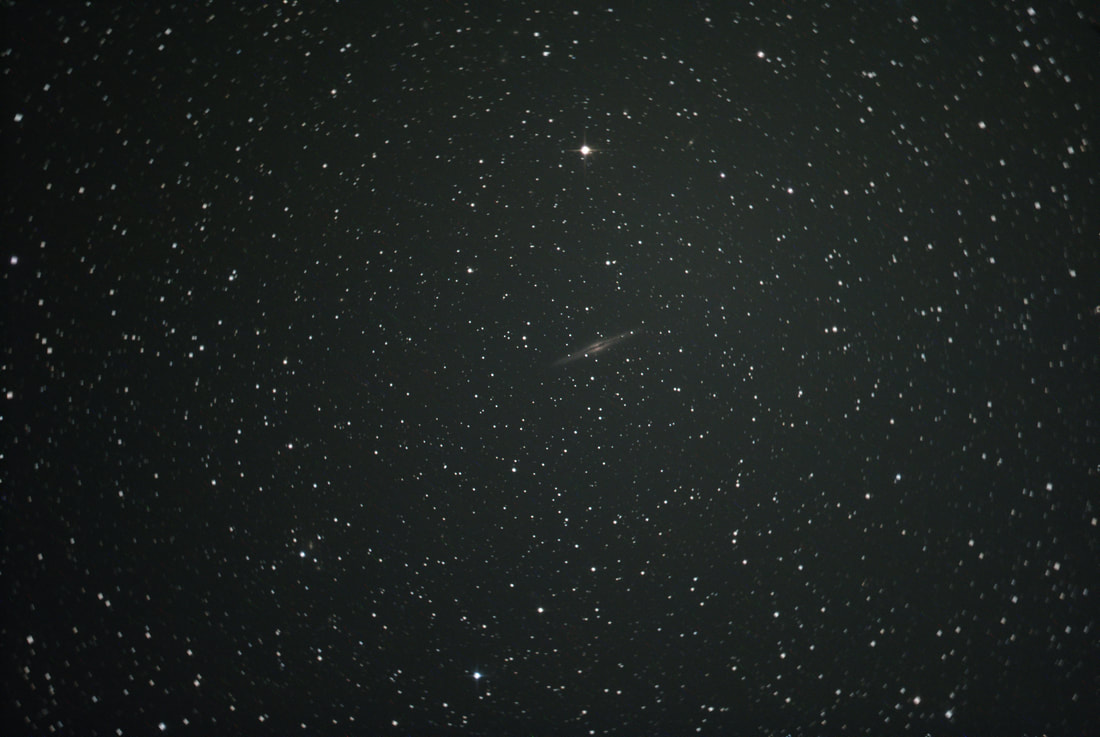
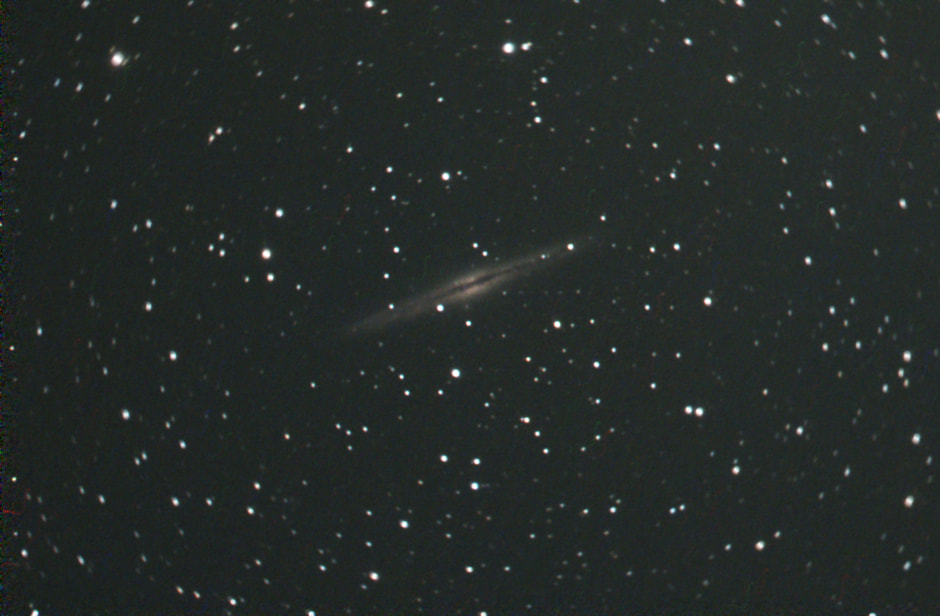
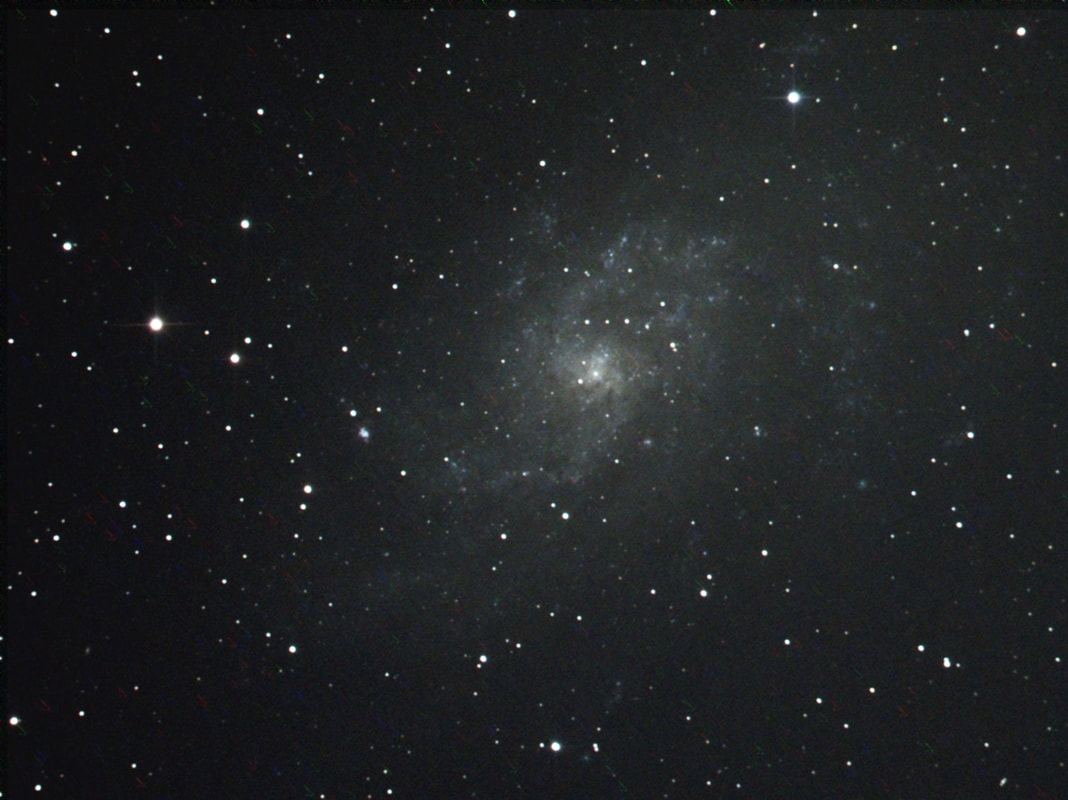
TEST 3. The next test images are comparisons of the M33 Triangulum-Pinwheel Galaxy with all three cameras “seeing” the same field of view. Again, the DS26c exposure setting was set at 5 second exposures while the DS10c and DS8300c were 2.5 second exposures to produce similar images, attesting to the similar sensitivity of the DS10c and DS8300c.

3A - DS26c m33 Triangulum-Pinwheel Galaxy
5 second exposures, 45 stacked, 100 gain (max), 10-63 histogram
5 second exposures, 45 stacked, 100 gain (max), 10-63 histogram

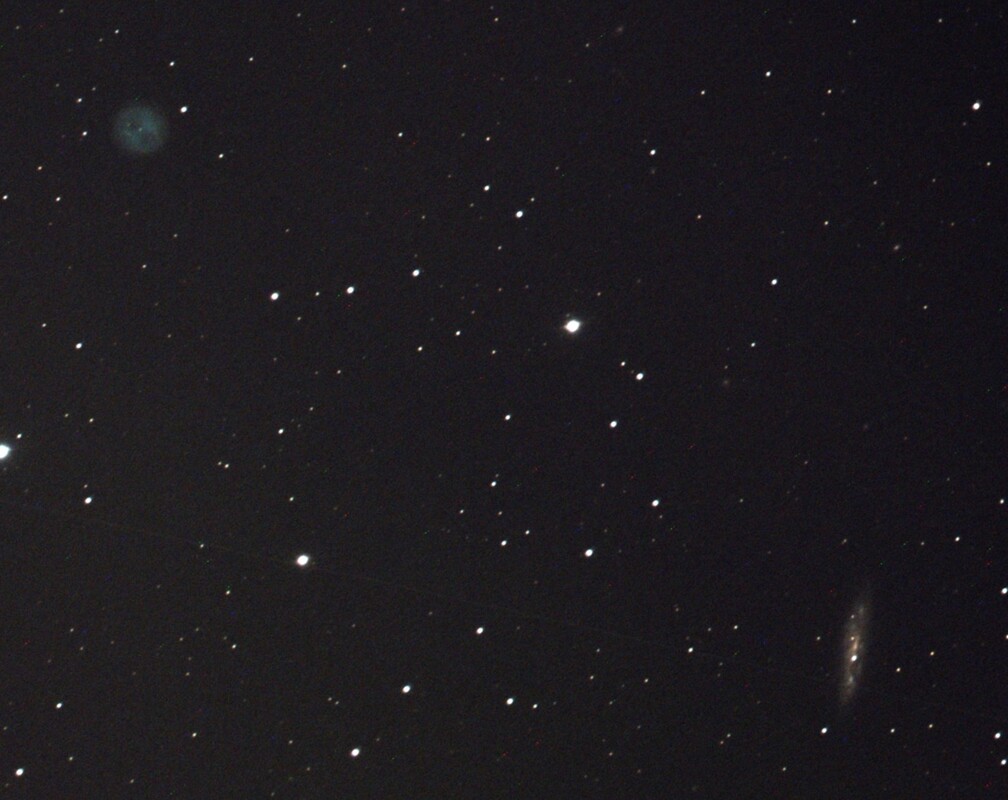
3B - DS10c m33 Triangulum-Pinwheel Galaxy
2.5 second exposures, 45 stacked, 160 gain (max), 35-110 histogram
2.5 second exposures, 45 stacked, 160 gain (max), 35-110 histogram

3C - DS8300c m33 Triangulum-Pinwheel Galaxy
2.5 second exposures, 45 stacked, 150 gain (max), 45-160 histogram
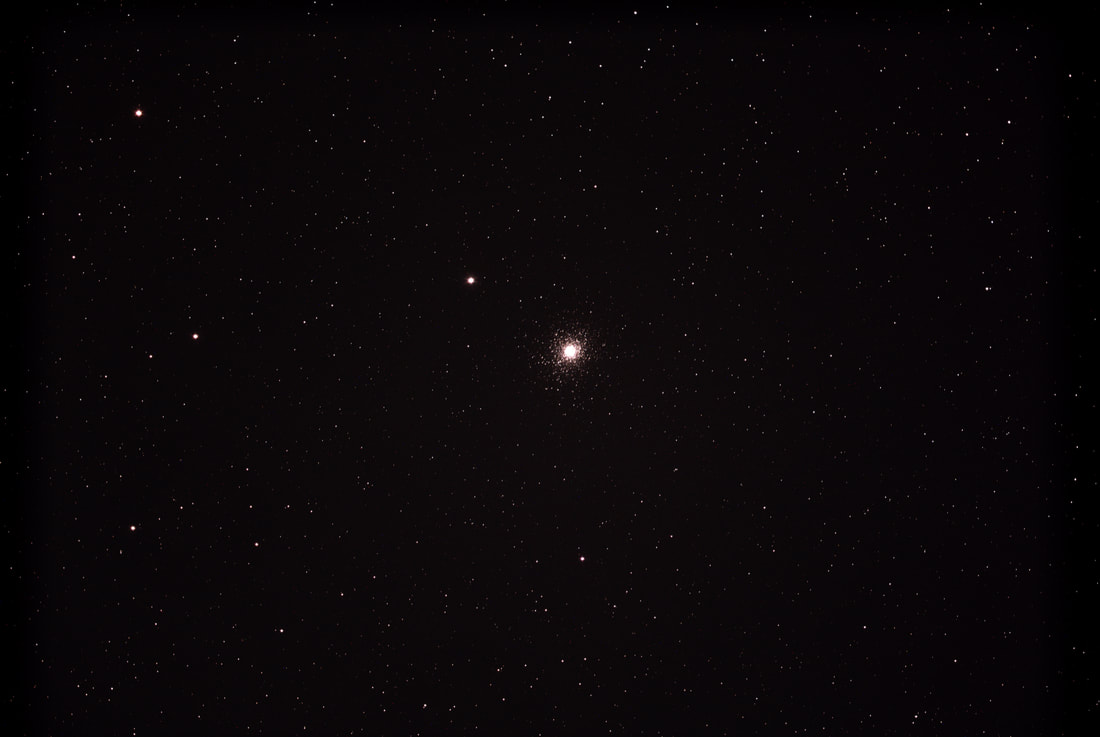
TEST 4. The final test images are comparisons of the NGC457 Owl-ET Cluster with all three cameras “seeing” the same field of view. For this cluster, the DS26c exposure setting was set at 5 second exposures while the DS10c and DS8300c were 1.5 second exposures.
2.5 second exposures, 45 stacked, 150 gain (max), 45-160 histogram
TEST 4. The final test images are comparisons of the NGC457 Owl-ET Cluster with all three cameras “seeing” the same field of view. For this cluster, the DS26c exposure setting was set at 5 second exposures while the DS10c and DS8300c were 1.5 second exposures.

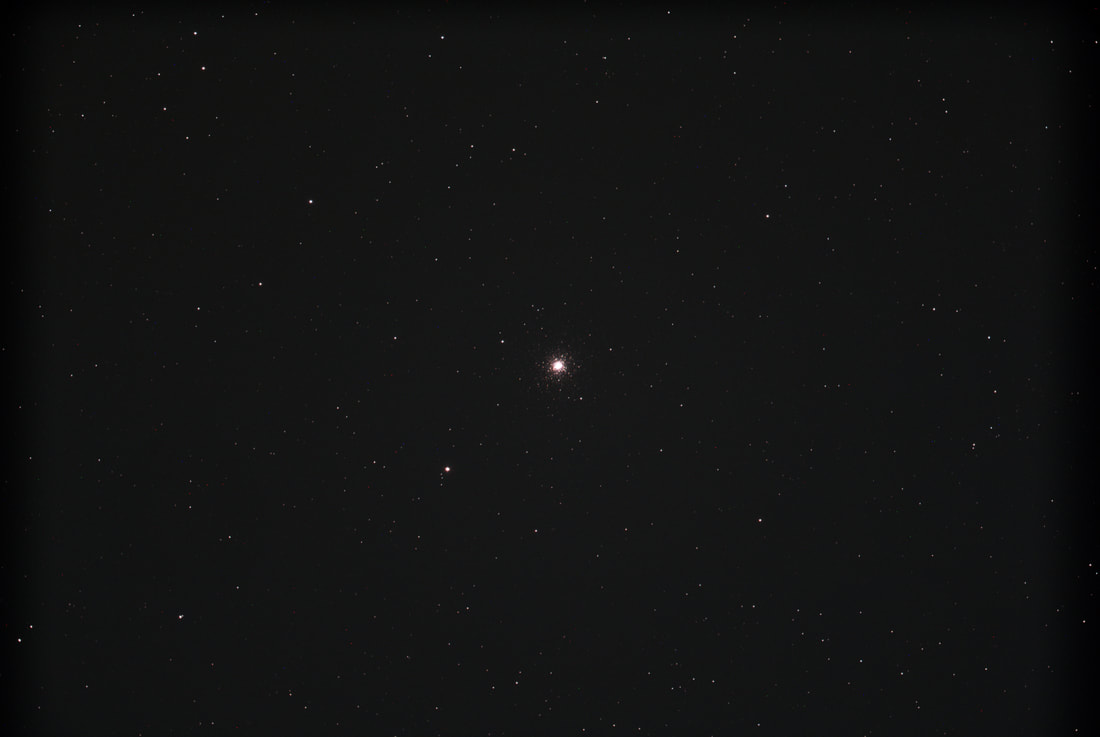
4A - DS26c NGC457 Owl-ET Cluster
5 second exposures, 10 stacked, 100 gain (max), 5-175 histogram
5 second exposures, 10 stacked, 100 gain (max), 5-175 histogram

4B - DS10c NGC457 Owl-ET Cluster
1.5 second exposures, 10 stacked, 160 gain (max), 15-200 histogram
1.5 second exposures, 10 stacked, 160 gain (max), 15-200 histogram

4C - DS8300c NGC457 Owl-ET Cluster
1.5 second exposures, 10stacked, 150 gain (max), 25-200 histogram
With clusters, I might note the time to a final image is even shorter. With the DS10c stacking 10 frames of 1.5 second exposures, it took only 22 seconds to stack them. Add a couple of minutes of live post processing and you see a fairly good image in under 3 minutes.
SUMMARY
In all tests the exposure time used with the DS10c and DS8300c were shorter than the DS26c for the same FOV. This implies that the DS8300c is more sensitive than the DS26c even though its pixel size is smaller than the DS26c pixels. The settings for the DS10c and DS8300c were very similar, which also implies their sensitivity appears to be similar, even though the DS8300c pixels are smaller than the DS10c. The smaller pixels of the DS8300c also provide a little more definition to the target.
So, if I am going to be viewing smaller targets, I believe the DS8300c will be my camera of choice. For wide field of view targets, like the North America Nebula, the DS26c wins. The DS10c would be a nice intermediate choice with good sensitivity but less resolution. I think the most notable result is how sensitive the DS8300c is even though it also has the smallest pixel size, which also provides the best resolution.


 RSS Feed