Remote Video Astronomy
Practical solutions to questions when using video assisted Astronomy remotely
  • Home
  • RVA
  • Start Simple
  • Learn More
  • Expand
  • Downloads
  • Blog

No Slew Limits for C8+Hyperstar on Evolution mount

12/30/2020

0 Comments

 
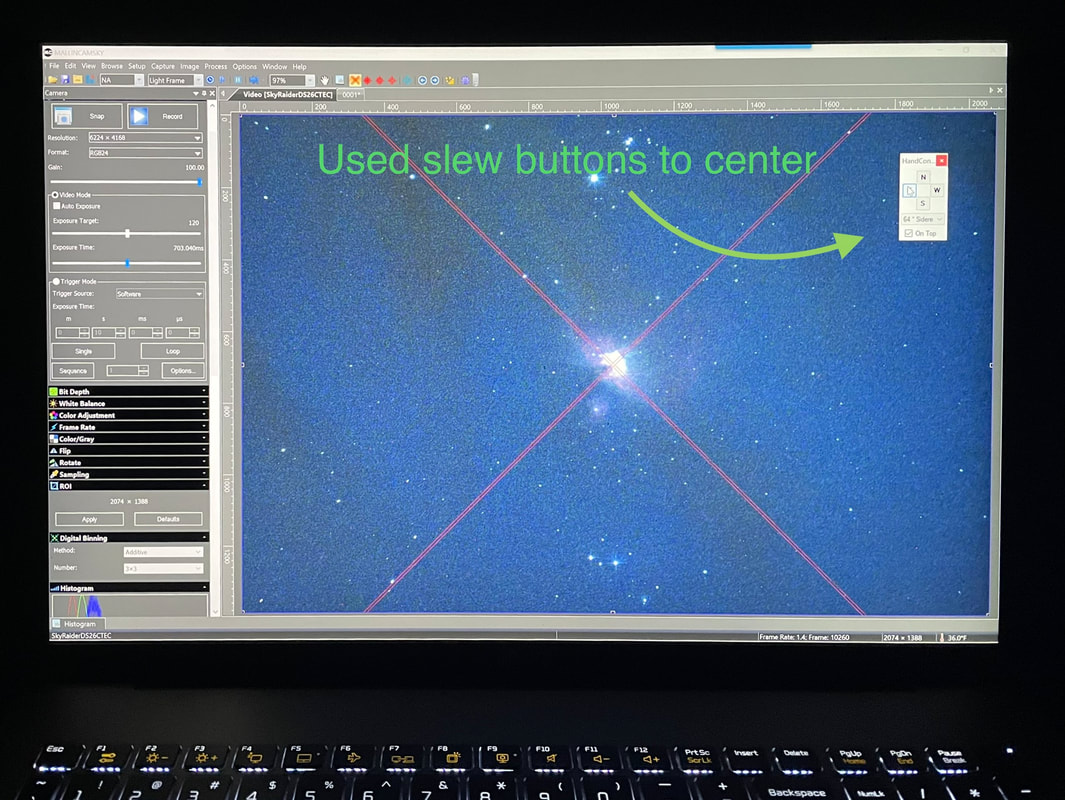
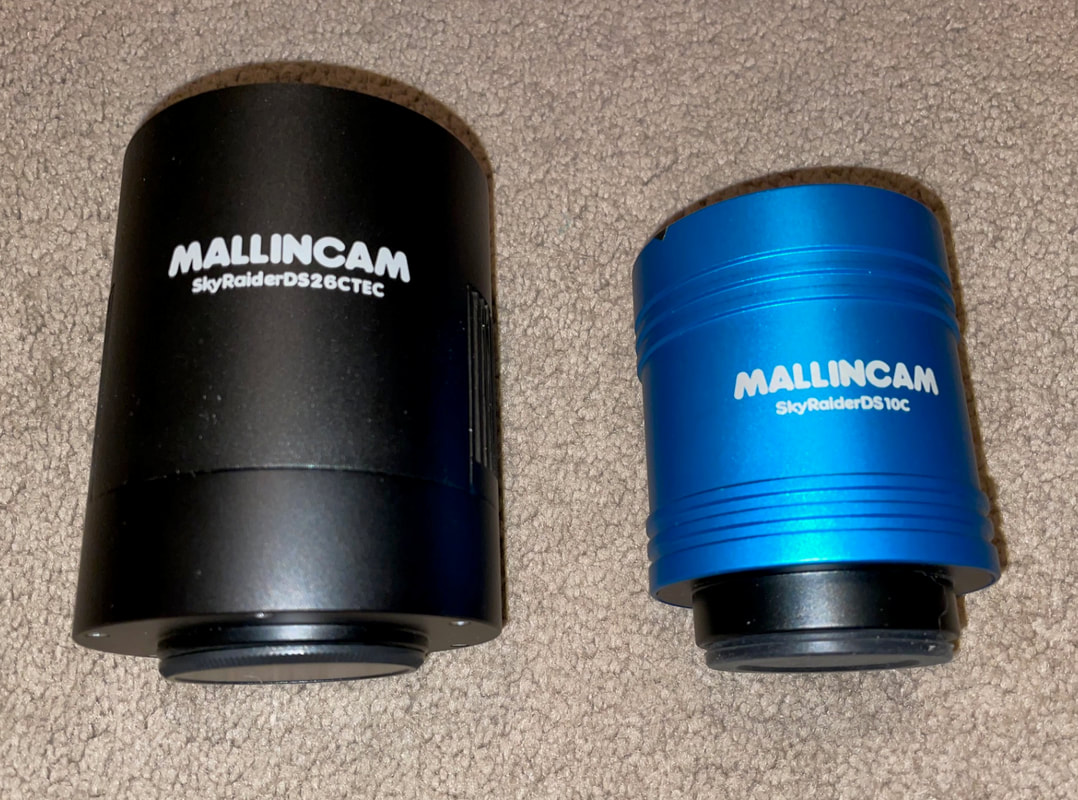
I have always been frustrated about having to limit my slews when using the Hyperstar with the Evolution mount to avoid hitting the mount with the counterweight. The other night I had been using the DS26cTEC with a diagonal on my C8 on the Evolution. I adjusteded the position of the telescope on the mount so the diagonal just clears the mount and I can point straight up.
​
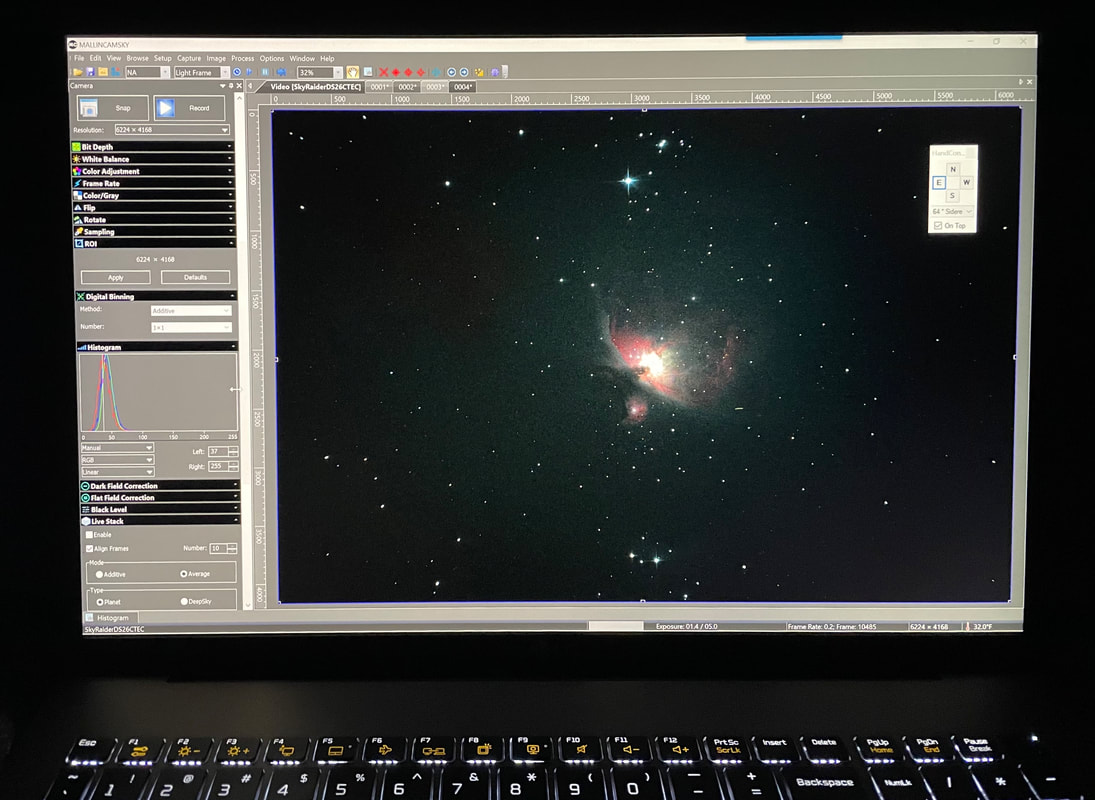
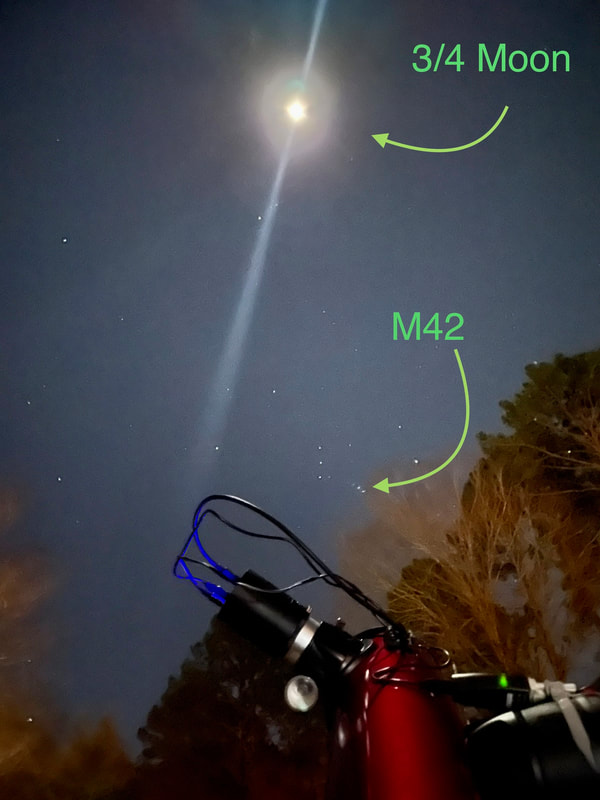
Later that night I decided to install my Hyperstar so I could view at F2. As I was removing the DS26cTEC from the diagonal I thought … I wonder if I can put the counterweight into the diagonal? So I inserted the counterweight being careful to not insert it too far. I then installed the Hyperstar and the DS26cTEC on the upper end of the telescope and the balance was good…and it clears the mount when slewing! I spent a great time viewing with the Hyperstar and Evolution mount without any slew limits.

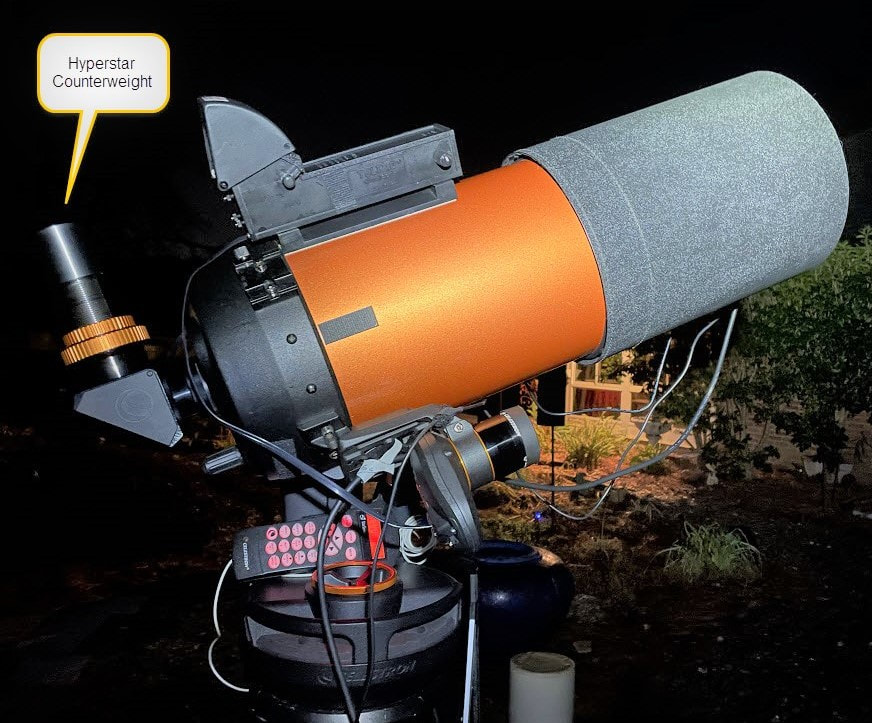
Here is a picture showing the Evolution mount setup with the steel rod counterweight inserted into the diagonal. 
Picture
​
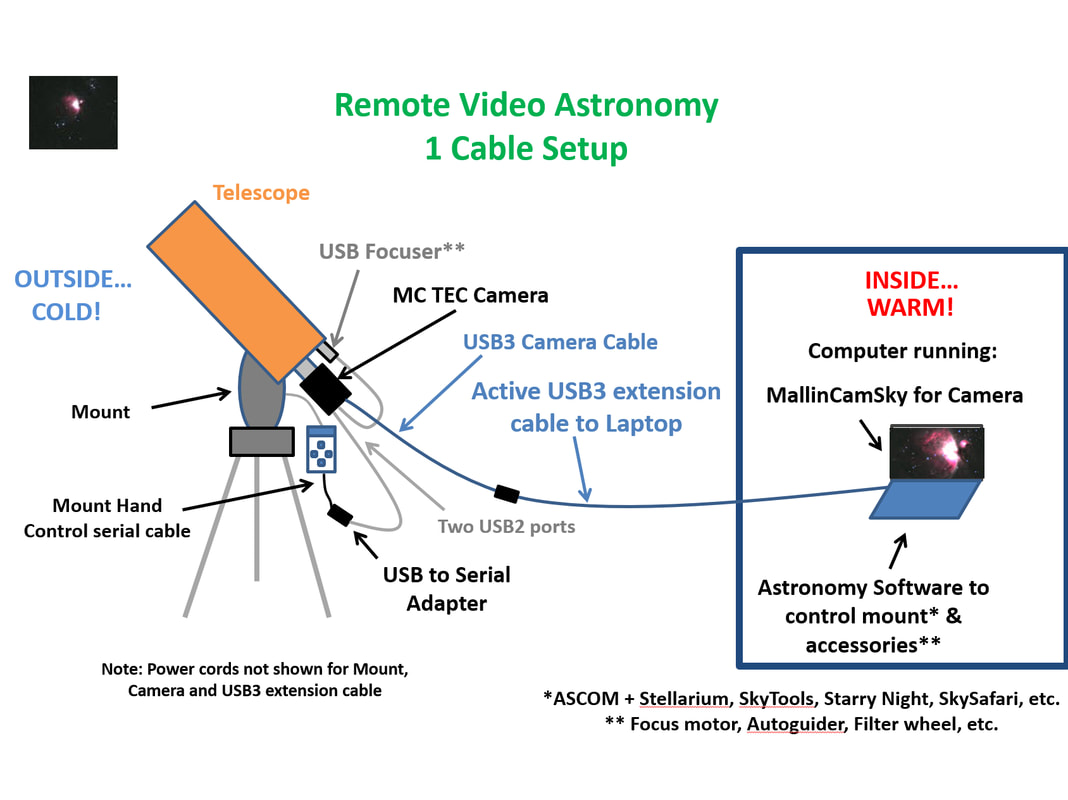
​Here is the Hyperstar, Camera and cables at the “other end” of the telescope. I am still working on my “loose” cable management for this setup. I can control the camera and mount though using a single USB3 cable to my laptop inside.
Picture
​Normally the counterweight is installed on the visual back of the telescope and you balance the scope by adjusting how far you insert the counterweight. But the amount you insert it does not change the balance when putting it in the diagonal. It just turned out that the balance was very good with the steel rod counterweight in the heavy duty 2” diagonal.

I did not seem to have any off-axis balance problems with the counterweight in this orientation. If I do notice it in the future, I could try just rotating the diagonal a bit away from the mount -- until everything is in balance in all positions.

The steel rod in the picture is the one Starizona ships with their HyperStar if you tell them you have a fork mount. It is a steel rod that you normally insert into an empty visual back. But it sticks out and can hit the mount base on short mounts like the Evolution.

By putting the steel rod counterweight into a diagonal instead of the visual back, it is at a right angle to the telescope rather than in-line with the telescope where it could hit your mount thus limiting your slew ability. I used my sturdy 2" diagonal with a 1.25" adapter to insert the 1.25" Hyperstar steel rod. If you replicate what I did, just be careful when you are inserting the steel rod into the diagonal so you don't put it in too far and hit the mirror inside the diagonal. But it was really worth it to me to be able to use the Hyperstar on my C8 on the Evolution without any slew limits - I could point straight up without hitting the mount!

Someone noted that a person might come and go to the diagonal and try to put their eye up to the counterweight to “look” into the telescope. Maybe I will have to put a warning on the end of the counterweight...Do not look here! But they would probably try even harder to look if I do that.  Somebody else suggested I put a small round mirror on the end of the counterweight so if anyone tries to “look” through it they will see their eye and think they are looking at a Deep Sky Object.
0 Comments

The Accidental Pretty Picture

12/27/2020

0 Comments

 
Sometimes you see a remarkable “unreal” image just because of the conditions and equipment you are using. On December 26, I was using my SkyProdigy C130 with the DS26cTEC and a SkyGlow-Moon filter because of the bright gibbous Moon that night. When I slewed to the Pleiades, there was a reflection of moonlight due to the location of the Moon. The settings caused the reflection to appear as an artistic splash of light green, and since I was using a Newtonian telescope, bright stars got the special bright star diffraction effect.  Here is what I saw on my laptop screen…
Picture
​I captured the image and am using it for my laptop background.
0 Comments

2020 Great Conjunction of Jupiter and Saturn

12/24/2020

0 Comments

 
Near the end of the year 2020, there has been a special astronomical event - the closest great conjunction of Jupiter and Saturn in 397 years. A conjunction is when two objects “appear” close to each other in the sky. A conjunction of Jupiter and Saturn only happens about once every 20 years and is called a great conjunction.

On December 21, 2020,  Jupiter and Saturn were separated by only 0.1 degrees, and appeared at first glance to look like a single bright “star.” If you had good seeing conditions and looked carefully you could tell that it was actually two objects very close together.

Since the occurrence of Jupiter and Saturn being this close together was just a few days before Christmas and looking like a single bright star in the sky,  the 2020 great conjunction is sometimes referred to as the “Christmas star”.

The December 21, 2020 conjunction was the closest great conjunction since July 16, 1623, where Jupiter and Saturn were slightly less than 0.1 degrees apart at the conjunction. However, it would have been difficult, if not impossible, to see it then since they appeared close to the Sun. The last time that these two planets were separated by less than 0.1 degrees and were easily observable was almost 800 years ago, during the great conjunction of 1226.

Jupiter and Saturn are much farther away from the Sun than the other planets we can see with our naked eye. Since an object's orbital speed decreases with distance, it takes them longer to go around the Sun.  Earth completes one orbit around the Sun in 1 year, Jupiter takes 12 years, and Saturn takes 30 years. Due to their long orbits, Jupiter and Saturn are seen together in the sky only once every 20 years.

But appearing as close together as in 2020 is rare. After 2020, the next great conjunctions will occur on November 2, 2040 and April 7, 2060 and their minimum separation will be 1.1 degrees. That’s 11 times farther apart than they appeared on December 21, 2020 this year. This year’s great conjunction was unusually close. Over a period of 1,000 years there are only six great conjunctions where they are less than 0.2 degrees (1623, 1683, 2020, 2080, 2417, and 2477).
​

Here is a graphic that shows the location of Saturn and Jupiter in the sky about 45 minutes after sunset on various days leading up to their conjunction on December 21, 2020.
Picture
I observed their positions on Friday, December 18 and Monday, December 21. Both evenings I took a picture with my iPhone and captured images with my MallinCam DS26cTEC through my 8” Telescope at F8. Here are the pictures I took from our back yard with an iPhone 12 mini looking Southwest over our rooftop.
Picture
Picture

​Here are the images from my telescope on those two evenings.  The image on 12/18/2020 is a composite of two image captures at different exposures to be able to see the rings of Saturn better.  These come from actual images I saw on my laptop screen with no planetary post processing. The one on 12/21/2020 is a single image capture and Saturn does not show up as well, but the shape of the rings are still noticeable. Some of Jupiter’s moons are visible in the images from both of these days.  You can see how Jupiter and Saturn appear very close together on the 21st compared to just 3 days before.
Picture
Here is a link to a nice image capture of Saturn and Jupiter on December 21, 2020,  by Thom Pfeil in Fayetteville, Texas using a Mallincam DS16cTEC on a 9.25” Telescope at F10.
​
Jupiter/Saturn conjuncture 2020 | Taken from Fayetteville, T… | Flickr


​​Note: Portions of the detail information about Jupiter and Saturn conjunctions came from Graham Jones’ article “The December 2020 Great Conjunction” on timeanddate.com. 
0 Comments

Using USB2 ports on MC TEC cameras

12/23/2020

0 Comments

 
When I got back into Astronomy a few years ago one of the first things I wanted to do was to control my mount remotely. I was able to use the serial connection on my Celestron hand controller to connect to a USB-to-serial adapter connected to my PC to do this using Starry Night on my Laptop. Later I started using SkySafari to control it via WiFi (Simulation Curriculum now owns both of these platforms).

I don’t have an observatory, but I have used both these techniques for Remote Video Astronomy to control my mount from inside my house. Now that I am using USB cameras and have a USB cable already running from my laptop inside to the camera outside, I have decided to go back to controlling my mount through the single USB cable out to the telescope. My recent cameras use USB3 cables, so I first tried a USB3 powered hub at the telescope and plugged my DS26cTEC cable into it along with my USB-to-serial adapter that runs to my Celestron hand controller. I was able to use a single powered USB3 extension cable from my laptop inside to the USB3 hub at the telescope and successfully control both the camera and the mount.

However, when I tried a longer powered USB3 active extension cable I started getting a message about too many USB hubs. I was trying to figure out how many I had in my cabling and remembered something about a built in USB2 hub in the DS26cTEC! Then I realized I didn’t need a separate powered USB hub at the telescope. I went back to running my single USB3 extension cable from my laptop directly to the DS26cTEC USB3 cable at the telescope and used one of the two USB2 ports on the back of the camera to connect to the Celestron hand controller (using my USB-to-serial adapter).

Here is a picture of the cable connections to the back of my DS26cTEC. The USB3 cable goes to the USB3 active extension cable to the laptop inside. The USB2 cable goes from the back of the camera to a USB- to-serial adapter which is connected to the telescope hand controller. The other cable is power for the TEC cooling (and the USB2 hub built into the camera).


Picture
It appears an actual USB hub was put inside the Mallincam TEC cameras to have a hub above the mount. So you only need to run a single USB3 cable to the back of the TEC camera to get two extra USB2 ports at the telescope. The power needed for TEC cooling probably made it practical to power a built in hub as well. This keeps the cable management much cleaner. It only supports two USB2 connections (probably to keep from interfering with the camera communications) but basic "things" like a focuser, autoguider, filter wheel or mount control don't need USB3 speed.
​
Here is how I now use just a single cable for Remote Video Astronomy from inside my home (or motorhome). I will probably add a focus motor to my telescope and plug it into the other USB2 port on the back of the camera to make it easy to adjust the focus.

Picture
I have used my MutecPower 65 Feet Active USB Extension Cable 3.0 from my laptop inside to the DS26cTEC to control the camera and my Celestron mount with no problem. When I was initially beside the telescope I just plugged the USB3 cable that came with the DS26cTEC into my laptop to control both the camera (using MallincamSky) and mount (which is connected to the USB2 port on the back of the camera) for startup tasks (verifying operation, focusing, etc.). When I was ready to move inside, I unplugged the camera USB3 cable from my laptop and inserted the USB3 cable into the 65 foot active USB3 extension cable, then took my laptop inside and plugged the other end of the active USB3 extension cable into my laptop and resumed operation.

​I successfully used Stellarium with ASCOM on my Laptop inside to select and slew to targets, make fine adjustments to center the target, etc.  See my 12/20/2020 blog post “DS26cTEC focusing and centering aids” for focusing and centering examples.

0 Comments

DS26cTEC focusing and centering aids

12/20/2020

0 Comments

 
Due to the large 26 megapixel chip of the DS26cTEC, there can be a screen update delay in the image you are viewing.  It doesn’t matter too much when you are viewing targets, but it really makes focusing frustrating.  I have found that using the ROI function around the target star makes focusing a lot easier! 

​In the past I would zoom in to 200% or higher on a star while using a Bahtinov mask, adjusting the focus and centering the line between the two fixed X lines.  I found when doing this with the DS26c there was a noticeable lag time between adjusting the focus and seeing the line move, even with very short exposures.  I realized that even though I was zoomed in, it was still retrieving all of the very big 6224x4168 image for each update and then just showing the zoomed in portion.  It didn’t matter that it was a short exposure because the delay was mainly due to the large megapixel image transfer from the camera to my laptop. The camera may take a few seconds to do something prior to the transfer - retrieve data from buffer, prep all that data to send via USB3
, etc. I first checked to make sure Sharpen was at 0 (using Sharpen does cause slight delays). Sharpen was 0. I switched to the Region of Interest function and put the ROI box around the star, clicked on Apply and then on Fit to Window. What a difference! The screen updated immediately as I adjusted the focus since only the Region of Interest was being transferred from the camera to the laptop.

Here are two 1150x898 images that are just the ROI around a star.  I also found when you save a ROI image the file size is just the size of the selected ROI, in this case just 3Mb. One is a little out of focus and the other is when I had it focused. Since only the 3Mb ROI portion was being transferred from the camera to my laptop, I could see the line move in real time as I adjusted the focus.
Picture
Picture

​An alternate way to increase the update speed while focusing is instead of using the ROI function, switch to a higher bin setting such as 3x3. At this bin setting I could zoom in on a bright star to fine tune focus in real time. Even though it is retrieving the full FOV image and just displaying the zoom area, the full FOV image contains a lot less pixels at 3x3bin (about 8Meg) and thus updates are fast enough for focusing.
 
I also started using higher binning when slewing to a new target.  I would set it to 3x3bin before slewing and select Fit to window so I could see the full FOV.  This typically overexposes the image but that is OK at this point. Once it finishes slewing to a target I can quickly tell if the target is centered.  If not, there is hardly any lag time in the screen updates and you can make minor adjustments to center the target in the FOV.  I then switch to a lower bin setting such as 1x1 or 2x2 to actually view the centered target.
Example added from 12/26/2020 session

Last night I used the DS26cTEC on my SkyProdigy 130 (5” Newtonian) to get an example of centering M42 (Orion Nebula) at higher binning and then switching to lower binning for viewing. Below are pictures of the laptop screen displaying the image at 3x3 binning after slewing to M42.  The picture on the left is where I saw the target was slightly off center. I was able to use the ASCOM virtual hand controller to quickly make minor slew adjustments to center M42 as shown on the picture on the right.
Picture
Picture
​I then switched to a lower bin setting of 1x1 to start viewing the centered target and make setting adjustments for a nice image. 
Picture
Picture
Of course with this wide FOV I could have just zoomed in to M42, but I wanted to keep the full FOV for effect and have M42 centered in the FOV.  I used a BAADER IR-Cut Moon & Skyglow filter since the gibbous Moon was fairly bright. The picture on the right shows the position of the Moon and M42 just above tree top level in the east. I took this photo with an iPhone 12 Mini just holding it in my hand using the 3 second night mode (I think the phone accomplishes this by stacking images for 3 seconds).  You can actually see the Orion constellation in the phone picture!    
0 Comments

DS26cTEC First Impressions

12/15/2020

1 Comment

 
I recently purchased a Mallincam DS26cTEC Video Astronomy camera that has a large 28.3mm Class 1 CMOS sensor with 6224x4178 resolution.   I have been very pleased with my existing DS10c, but had been thinking about getting a TEC camera for active cooling and greatly reduced hot pixels. When I heard about the DS26cTEC, I decided that was the TEC camera for me to move up to with an even bigger FOV, higher resolution and increased sensitivity.

Here are some of my first thoughts about the DS26cTEC…
1. The larger chip produces a very nice Field of View (chip diagonal 28.3 vs 21.63mm for DS10c)
2. Its smaller pixel size produces higher resolution detail (3.76 vs 4.63 microns for DS10c).
3. This is a lot of pixels (26.1 vs 10.7 megapixels for DS10c)!
4. The sensitivity is extremely good. When using 2x2 binning, it is awesome. I have also tried 3x3 and 4x4 binning with decent resolution. When using different binning settings, the FOV remains the same.
5. The TEC cooling produces very pleasing images without having to use darks (it uses the same cooling system as DS10cTEC version). Moving to a camera with TEC cooling does require a second cable to the camera for power, but I was able to easily figure out how to route the power cable at the telescope up to the camera.
6. No amp glow (same as DS10c).
7. I find using the Region of Interest (ROI) setting in MallincamSky is really effective with this camera for “zooming” in on your target and only stacking the pixels you are interested in. This also reduces the file size of saved images.

On the left is a picture my new black DS26cTEC next to my blue DS10c (which does not have TEC cooling), and on the right a picture of a black DS10cTEC (with cooling).  
Picture
Picture
As you can see in the image on the right of a DS10cTEC, the addition of the TEC cooling feature increases the size of a camera, and it is worth it!
​
The MallinCam website describes the TEC feature this way. “MallinCam developed a unique cooling system that provides no direct physical contact between the Peltier cooler and the sensor.  Instead, the Peltier cooler creates a convection system “refrigerator-like” environment that cools the sensor without actually contacting it.  This cooling system is unique to MallinCam and not found on other astronomical imaging cameras.” … “ MallinCam has successfully designed a working alternative - a cooling chamber called refrigeration cooling - which subjects the CMOS sensor to cooling inside a triple sealed vacuumed sensor chamber controlled with a heating element mounted around the internal optical window to control and avoid dew formation on the optical window and surroundings. A vacuumed sealed chamber is used to eliminate the use of desiccant material and keep dew free environment permanently.” … “The result of this new technology [is it] will not require a dark frame for live application or imaging in most cases.”

My blue DS10c is a great camera. You can see my most recent images using the DS10c in my 10/24/2020 blog “Dark Skies in Oklahoma”. My DS10c produces nice images as long as I use darks to reduce the effects of hot pixels. I have to use darks most of the time with my DS10c - too many distracting hot pixels in the southern summers here if I didn't use darks (since my DS10c does not have TEC cooling). I found darks worked best when the darks were captured at similar settings as the image (Exposure, gain, histogram, etc.) This helped reduce the distracting pixels, but took up some of my time that I could have been viewing. That is one reason I wanted to get a TEC camera so I could quickly experiment with different settings to obtain the best image while viewing. With TEC cooling, there are very few hot pixels and average stacking does a pretty good job of reducing the distraction of any remaining hot pixels for near real-time viewing.

I know others with the DS10cTEC have success viewing without having to use darks due to TEC cooling.  So far, I feel like I made the right choice for me to step up to the DS26cTEC to be able to “view” without having to capture and apply darks and getting a larger chip size/FOV and higher resolution.

I am still learning about using the TEC cooling. I use with the recommended default of 0 C (it now shows 32 F on my screen since I changed my preference setting to F). At the end of a session, I turn off the TEC cooling but let the fan run for a few minutes until the temp in the lower right of the screen reaches ambient temp and then I close MallincamSky and turn off power.

So far I have only had a few nights I could try the DS26cTEC out (mainly because of weather).  
Here are images from the DS26cTEC on three telescopes that will give you a feel for the Field of View with this chip size. I will happily note that I did not capture/apply any darks when capturing images shown in this post.
Picture
​My first light with the DS10cTEC was of the moon using my MCR-80 F5 refractor. 
​

Picture
Here is a nice image of Andromeda (M31) on a Newtonian 130mm (5”) F5 reflector. 
​

Picture
This  image of the Pleiades (M45) gives a good idea of the FOV using my 8”               Schmidt-Cassegrain with Hyperstar at F2.
Using the Region of Interest (ROI) feature of MallincamSky is a great way to just view your target area of interest and only average stack the image portion you need. I noticed using ROI makes the stacking process more efficient and faster for the DS26cTEC compared to stacking the full FOV image resolution of 6224x4186. Also with ROI, saved images only include your target region resulting in smaller image files. Combining ROI with 2x2 binning can be a powerful combination with this camera. Due to the small native 3.76mm pixel size, using 2x2 binning still produces an image with good resolution.

The latter part of November we took our RV to a campground with a Bortle 4 rating. Rain was predicted for the first two nights and the third night was questionable. So I just took my easy setup SkyProdigy Mount (with StarSense) and the 130mm Newtonian F5 reflector that came with it. Back in 2014, the second blog post I made on my RemoteVideoAstronomy.com site on 11/17/2014 was titled “A good beginner telescope for RVA” and I used the Mallincam Micro on it. Fast forward to 2020 and I still use this telescope and mount for trips where I “might” have a viewing night. It paid off for the first part of the last night at this campground with a clear dark sky.

So here are some examples of putting an amazing DS26cTEC on the “little telescope that thought it could” at a Bortle 4 campground. These are all on a 5” Newtonian reflector at F5 using the DS26cTEC with 2x2 binning under clear dark skies.

In the following 3 examples the original field of view image is on the left and the image with ROI enabled is on the right. 
Picture
Picture
M27 (Dumbbell) at 3 secs 100 gain 10-75 histogram 10 stacked 2x2 bin
​

Picture
Picture
M17 (Omega/Swan) at 2.2 secs 100 gain 45-200 histogram 22 stacked 2x2 bin.
​

Picture
Picture
NGC8912 (Spiral galaxy) at 5 secs 100 gain 12-100 histogram 10 stacked 2x2 bin.

Here are a couple of examples of just an ROI image using Live High Dynamic Range (LHDR) technique where some settings are changed during the stacking process:
Picture
M33 (Triangulum/Pinwheel) 5 secs 100 gain 20-135 histogram 10 stacked then 25-75 histogram 20 more stacked (LHDR) 2x2 bin
Picture
NGC253 (Sculptor/Silver Dollar) 4 secs 100 gain 64-200 histogram 10 stacked then 64-150 histogram 10 more stacked (LHDR) 2x2 bin
​

Back at home, I captured an image of the Orion Nebula using my Celestron 8” SCT with the Universe Focal Reducer and a 10mm spacer.  There is a little vignetting with the 10mm spacer (another day I tried the Universe Focal Reducer without a 10mm spacer and it greatly reduced the vignetting effect).
​
In the following image I used the LHDR technique at 100 gain 0-255 histogram and varied the exposure from 1s,2s,3s,4s,5s and then changed the histogram to 0-50 for the remaining time. Interesting combination. There were 35 total images average stacked. I did a quick enhancement (<1min) of the final image using Microsoft Photo editor for it to show up better on the web.
Picture
m42 (Orion Nebula) 1s..5s 100g 0-255h..0-50h 35stk

I will have to say I am very pleased with my new DS26cTEC!  I hope to soon try it out more on my 8” SCT with Hyperstar at F2.
1 Comment

    Author

    Astronomy was my favorite hobby many years ago, but was gradually set aside due to work, family and life in general.  In recent years I resumed my hobby looking forward to using the new technology that is now available.  Then I discovered Video Astronomy.  Then I learned how to do it Remotely.  I wrote some books, and decided to set up this web site to continue to pass on what I learn.

    ​Jim Meadows

    Questions or comments?  Email me at:
    ​[email protected]

    NOTE: If you use Microsoft Edge and clicking on an Archives or Categories link below does not work, please try an alternate browser (e.g. Chrome).

    Archives

    February 2025
    August 2024
    April 2024
    February 2024
    October 2023
    June 2023
    September 2022
    May 2022
    May 2021
    December 2020
    October 2020
    May 2020
    March 2020
    February 2020
    July 2019
    June 2019
    May 2019
    January 2019
    December 2018
    November 2018
    October 2018
    April 2018
    March 2018
    November 2017
    October 2017
    September 2017
    August 2017
    June 2017
    April 2017
    March 2017
    January 2017
    December 2016
    October 2016
    August 2016
    July 2016
    May 2016
    April 2016
    March 2016
    February 2016
    January 2016
    December 2015
    September 2015
    August 2015
    June 2015
    April 2015
    March 2015
    January 2015
    December 2014
    November 2014

    Categories

    All
    Accessories
    AGc / AGm
    Articles By Others
    Astrophotography
    Auto Align
    Build
    Commentary
    DS10c
    DS2.3+
    DS26cTEC
    DS8300cTEC
    Eclipse
    Focal Reduction
    Hyperstar
    LHDR
    LPP
    Mallincam Micro
    MallinCam Netbook Kit
    MallinCamSky
    MallinCam X2 / XT
    MallinCam Xterminator
    Miloslick
    Mmec Software
    Permanent
    Pier
    Portable
    Pro Dob 2
    RASA
    RVA
    SkyBT
    SkyFi
    SkySafari
    SkyShed
    Software
    Solar Viewing
    Star Parties
    Starter Telescope
    Video Astronomy

    RSS Feed

Web Hosting by Domain.com