Expand
So you have set up and been using a system similar to that described under Getting Started, and have read some from the References. What do you do next? Expand of course!
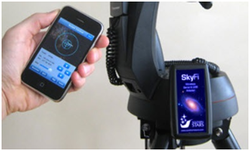
You have a very basic Remote Video System, but having to pass the hand controller through a window gets old after awhile. You can improve your remote control ability by getting a Wi-Fi device to control your mount such as Southern Stars SkyFi ($160), hand controller connecting cable ($30) and their hand held SkySafari Plus planetarium software ($15) for selecting and slewing to objects (SkySafari can be run on a smart phone, iPad or Mac). Plus it is a great tool when you are at your telescope for visual observing as well. The user interface of this application can greatly enhance your RVA experience.

If
your telescope is too far from the house for the WiFi signal, you may be able
to control your mount using an extended USB cable from your computer inside, out
to a USB serial adapter and a serial cable connected to your mount's hand
controller. You can use planetarium software
running on your computer to select and slew to objects, typically through an
ASCOM driver loaded for your particular brand of mount. When your telescope has finished slewing to your
target, you can make small adjustments to your mount's position through the
software while watching your Video image to better center your target
object.
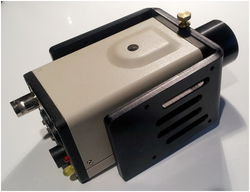
At some point you will want to upgrade to a higher end Video Astronomy camera, with even longer exposure capability and expanded adjustments. After I became sold on how great Video Astronomy is, I took the plunge and purchased the MallinCam Extreme X2. To sum up its abilities in one word…Wow! There is now available a MallinCam Junior Pro PC camera ($600) that has many of the features of the Extreme and includes a video/power cable plus a cable for computer control. I use my MallinCam micro now as a Video Finder scope. When thinking of the cost of a video camera, just remember the camera is replacing all your eyepieces when you switch to Video Astronomy. There are certainly other good Video Astronomy cameras on the market, and I am sure we will see even more over time. I have mainly purchased MallinCam products because they have been the pioneer in this field for years.
At some point you will want to upgrade to a higher end Video Astronomy camera, with even longer exposure capability and expanded adjustments. After I became sold on how great Video Astronomy is, I took the plunge and purchased the MallinCam Extreme X2. To sum up its abilities in one word…Wow! There is now available a MallinCam Junior Pro PC camera ($600) that has many of the features of the Extreme and includes a video/power cable plus a cable for computer control. I use my MallinCam micro now as a Video Finder scope. When thinking of the cost of a video camera, just remember the camera is replacing all your eyepieces when you switch to Video Astronomy. There are certainly other good Video Astronomy cameras on the market, and I am sure we will see even more over time. I have mainly purchased MallinCam products because they have been the pioneer in this field for years.

If you are still using the small low res LCD
monitor described under Getting Started, you probably want to find a better,
higher resolution viewing solution for inside.
That small low res LCD will always be useful when setting up at the
scope, especially when you are getting your camera in focus with a focus mask. Connecting your camera's video cable to a TV
that has a composite Video input will provide a much better view while inside
though. Or you can add a Video Capture device that
plugs into your computer's USB port to view the image from your camera on your
computer screen.
But that is a lot of USB cables to run from your telescope to inside. A solution is to add a powered USB hub at the telescope and run a single active USB extension cable from the USB hub at your telescope to your computer inside. This is my preferred solution when using several USB devices.
But that is a lot of USB cables to run from your telescope to inside. A solution is to add a powered USB hub at the telescope and run a single active USB extension cable from the USB hub at your telescope to your computer inside. This is my preferred solution when using several USB devices.

I leave my telescope setup in my garage under a cover. For a viewing session, I roll it out onto my driveway, plug in a power strip that provides power to all my stuff, and then connect the active USB extension cable to the hub and run it inside to my computer, and I am ready to begin. Sometimes I connect my laptop to my HDTV via HDMI using the HDTV as a second monitor.

I can operate reliably at a distance of 100' with this setup. This single USB cable run also works well for a RVA setup near the telescope in a semi-protected environment such as inside a vehicle, a tent, or inside a garage.
I describe this setup in detail, and other setups that work well (and some that don't) in my book "Beginning Remote Video Astronomy ... So, what's the matter". You will find other topics covering wireless video to HDTV, other wireless control solutions and limitations, use of video filters, auto align accessories, keeping an eye on your telescope while inside, focal reducers and your field of view, how to operate it all on battery power, and so on.
Check out my blog tab for additional updates about things I find that work well for Remote Video Astronomy. And be sure to go to www.Liveskies.org to watch and learn how others are continuing to explore and expand this ever growing branch of Video Astronomy.
Check out my blog tab for additional updates about things I find that work well for Remote Video Astronomy. And be sure to go to www.Liveskies.org to watch and learn how others are continuing to explore and expand this ever growing branch of Video Astronomy.