https://www.kickstarter.com/projects/theplanetarysociety/lightsail-a-revolutionary-solar-sailing-spacecraft
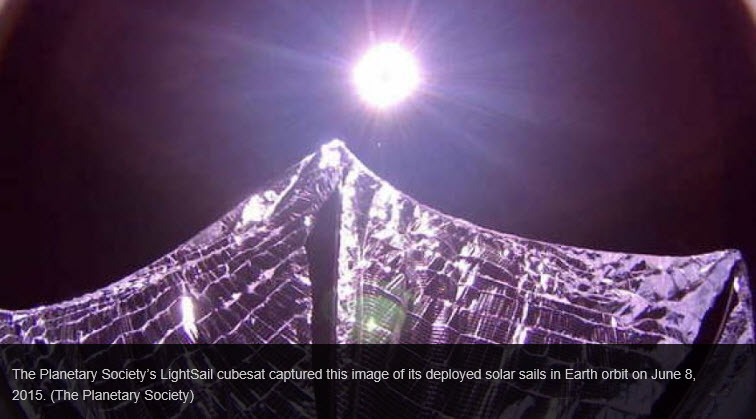
LightSail launched to low Earth orbit May 20 aboard the same rocket that lofted the U.S. Air Force's robotic X-37B space plane on its fourth mystery mission. The cubesat was tasked with proving the viability of some key components of solar-sailing technology, which allows spacecraft to harness the momentum imparted by photons streaming from the sun. On this first flight, mission managers wanted to see how LightSail's core systems work — especially the gear designed to deploy its 344-square-foot solar sail. The overall goal was to pave the way for a true orbital solar-sailing trial by another LightSail cubesat, which is due to launch next year. (Fox News) There are 4 days left to be a backer. I am a backer and here is the link if you are interested.
https://www.kickstarter.com/projects/theplanetarysociety/lightsail-a-revolutionary-solar-sailing-spacecraft
0 Comments
What do you do with the finder scope of a Celestron 8SE if you have to remove it to install a StarSense AutoAlign? Do you have to drill new holes if you want to use a Mallincam Micro for a video finder scope? These were a couple of questions asked by one of the readers of my book "Beginning Video Astronomy...So, what's the matter?". Let me first say don't drill! You can make use of existing screw holes by first removing the telescope's small plastic Star Pointer with a Phillips head screwdriver. I then installed an Orion 07215 Schmidt-Cassegrain Finder Scope Base which fits the factory drilled holes where the Star Pointer was located (it is also compatible with Meade and Orion Schmidt-Cassegrain telescopes). It attaches directly to the SCT optical tube with included mounting screws that are slightly longer than the screws you remove from the SCT optical tube. The extra length is needed to be able to attach the Orion base to the telescope. It actually comes with two pairs of screws. You have to examine them closely to group the pairs. You will only use the pair that matches the threads of your factory drilled holes. Carefully try one of the screws in one of the screw holes, turning it by hand to make sure it goes in without stopping. If so, that is the pair to use. If not, try the other pair. Here is the Orion base mounted to the SCT optical tube. The StarSense AutoAlign comes with two types of brackets. You can use the larger bracket on the Celestron 8SE telescope, but if you use the smaller bracket you will be able to easily switch between the StarSense and the Video Finder Scope. Follow the StarSense instructions to replace the large bracket with its small bracket. The small bracket is compatible with the Orion finder scope base so you can just slip the StarSense into this base and tighten the hand screw. I am currently using the Mallincam Micro-Super with the Orion 13022 Deluxe Mini 50mm Guide Scope for my Video Finder scope. The video finder scope will also easily slide into the Orion bracket base. The MallinCam Micro-Super has more sensitivity than the original Micro-EX, but both will work fine as a video finder. If you are purchasing a Micro, I recommend spending the little extra to get the Micro-Super for the extra sensitivity, and it has virtually zero amp glow! I also recommend getting the wired Micro version which has a single lightweight cable that comes out of the back of the camera. The other end of the cable has video out, power in, a serial camera control socket and a small button control that you use instead of pressing buttons on the back of the video camera. This reduces the possibility of affecting the alignment of your video finder scope due to heavy cables or trying to press buttons on the back of the camera. Of course I also recommend connecting the serial camera control to your computer and using my free MallinCam Micro Extended Control software to control the Micro from your computer so you can easily select presets for various targets (see my Download tab). I also installed an Orion finder scope base on my Celestron C5 telescope so I can use the StarSense AutoAlign or Video Finder Scope on it as well. If you have trouble mounting a finder base on your telescope (e.g. the screws are not long enough), you can take a screw you remove from the telescope to a local hardware store to get a longer screw. Be sure you match it properly, especially if the telescope screw is metric. Also take care when screwing the base onto your telescope to insert the screws at right angles to the telescope. Since the telescope is round, the two screws will not be completely parallel to one another. So what do you do if you miss having your simple red dot Star Pointer? I highly recommend getting a TELRAD reflex sight, which is much easier to use. The red TELRAD rings are continuously adjustable from off to full on. It is lightweight and requires no mounting screws. You use the supplied double stick tape to mount its base directly to the side of your telescope tube. You can easily take the TELRAD on and off. It does look somewhat large, but it is very lightweight. If you buy the dew cover accessory that also contains a small mirror, in addition to looking straight through the TELRAD you can also view from a 90 degree angle as needed. What if you want to use both the StarSense AutoAlign for aligning and the Video Finder Scope to assist finding and centering your faint fuzzy objects? After you complete your StarSense AutoAlign, you can remove it and slide the Video Finder Scope in its place. Or if you prefer to have both of them mounted on a Celestron C8, you can use the other mounting screw locations and either add an additional Orion finder scope base or install the StarSense AutoAlign large base (and keep the large bracket on the StarSense AutoAlign) since there is no need to swap it with anything. Be sure to use the holes for mounting finders – do not remove the smaller telescope assembly screws! Here is a picture of the TELRAD finder, the Video Finder Scope and the StarSense AutoAlign all mounted on my Celestron 8” telescope which is now on a CG-5 Equatorial mount. This works fine with the C8 on my Equatorial mount, but on the SE mount this puts the StarSense AutoAlign somewhat on the underside of the Telescope since the C8 is side mounted on the SE mount. It should still work OK as long as the StarSense AutoAlign “sees” the sky OK. Be sure to calibrate the StarSense Camera wherever you mount it by selecting the StarSense Camera from the hand controller menu, choosing Calibrate, and then follow the prompts.
Here is another picture that better shows the various mounting techniques. |
AuthorAstronomy was my favorite hobby many years ago, but was gradually set aside due to work, family and life in general. In recent years I resumed my hobby looking forward to using the new technology that is now available. Then I discovered Video Astronomy. Then I learned how to do it Remotely. I wrote some books, and decided to set up this web site to continue to pass on what I learn. Categories
All
|