
I have found I can use other light weight scopes on my SkyProdigy mount. I can easily use my C5 on my SkyProdigy mount for a nice portable Remote Video Astronomy setup. Since the C5 is a short scope, it can point straight up without worrying about slew limits (I would guess this would be true of the SkyProdigy 6 as well). When changing scopes, I find it is best to recalibrate the SkyProdigy’s camera to improve centering when slewing to an object. This is an intermediate setup beyond what I describe in the Start Simple tab. By using the MallinCam MFR-5 reducer on the Micro and a Celestron F/6.3 reducer on the Scope, the F10 C5 effectively is converted to a faster F3.2 setup for Video Astronomy. Stacking these two focal reducers is pushing the limits a little though (I sometimes remove the F/6.3). Here is a photo of the equipment setup. 
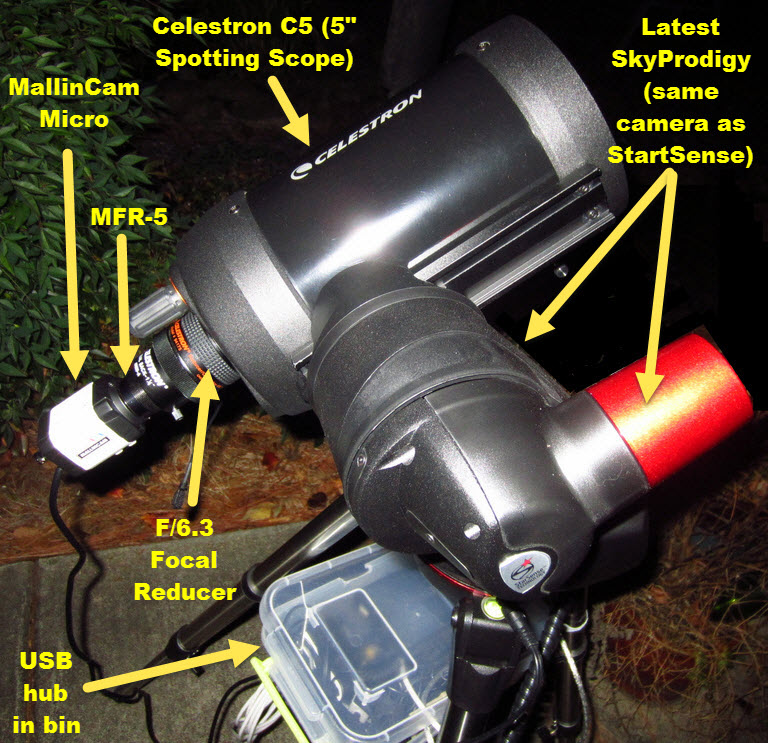
This makes a lightweight “Grab & GoTo Scope” setup for RVA using the SkyProdigy mount. The Micro video output cable is connected to a small video capture device located inside the plastic bin. The video capture device USB cable along with the Micro camera control USB cable and hand controller USB cable are plugged into a powered USB hub also in the plastic bin attached to the mount’s tray. I keep my scope setup like this inside. To use it, I pick it up and take it outside, power on and start the auto align. While it is aligning, I unroll the hub’s 35 foot active USB cable, pass it through a window (and close the window down to the cable) and connect the USB cable to my laptop inside. By the time the SkyProdigy finishes the alignment (about 3 min) I am ready to begin viewing inside. ![]() Using my Micro Extended Control software, I click on the Focus preset first thing, slew to a bright star and make sure it is still in focus. If not, I go back outside with a battery powered LCD to connect to the camera, put the focus mask on and adjust the focus… and try to remember to remove the focus mask when done 😊. I reconnect the camera video output to the video capture device and return inside. From first picking up this setup to beginning to slew to my first target is about 10-20 min depending on the focus check. Anytime I slew to a new target (from inside), I click the Focus preset and center my target object using the telescope controls in Starry Night on my laptop. Since the Focus preset enables the image to be updated every ½ second, it is a good setting to use when centering target objects like clusters or DSOs. Once centered, I click on the appropriate Preset for the target object for better viewing. Sometimes I also click on Adjustments to fine tune the Exposure and Enhance settings.
0 Comments
This is a question that some have wondered about. You may be wondering what does this question mean and why should I wonder about it? This would be of interest to you if you have or were thinking of purchasing the MallinCam Micro for Video Astronomy use. Sky conditions were not the best, but served my purpose for this test. Here is the Dumbbell in color using a 17 sec exposure (without using 3D-DNR) on a 5” Celestron with F/6.3 focal reducer and the Micro with a MFR5 focal reducer. So what’s the deal with using 3D-DNR? This additional setting allows you to average up to five 17 second images in real time, in color. But to use 3D-DNR the AGC must be turned on, which can wash out an image and make it appear to be just a monochrome image. Unless … you also adjust the color settings. I was able to successfully produce an image of the dumbbell with color using 3D-DNR. Below is the Dumbbell with 3D-DNR stacking set to 5, AGC set to high, Brightness set to 2 and Color/WB/ATW R-Y Gain = 250 & B-Y Gain = 250. Here is the result. And this was from my backyard near a city with a partial moon! Due to the sky conditions, these pictures are certainly not breath-taking, but they do illustrate the Micro can show color when stacking. Just to emphasize the sky conditions, here is the image of the Moon I also captured right after viewing the Dumbbell. Not great conditions for viewing DSOs, but it is a nice view of the Moon! Equipment, software and setup These images were produced with a Celestron C5 (5" spotting scope) with a F/6.3 Focal Reducer and the Micro with a MFR-5 focal reducer on the latest SkyProdigy mount. This is my quick Remote Video Astronomy setup. I can pick it up and take it outside, start an AutoAlign, extend the cable inside to my laptop and be viewing from inside in 10-20 minutes. All these images were viewed and captured while inside. I have actually written my own software for the Micro with Exposure and Enhancement presets so I can just click on a DSO icon or a Moon icon and it automatically sends the commands to the Micro to change the settings. The software is available for free on my Download tab. All but the color R-Y gain and B-Y gain can be automatically set using my Micro Extended Control Preset. To include 3D-DNR stacking in the DSO preset, modify the setDSO.txt file as shown below (the setDSO.txt file is in C:\MicroSettings): Exposure: Normal Senseup: Off AGC: High Lens: x1024 Brightness: 2 Gamma: 0.45 3D-DNR: 5 Monitor: LCD DPC: Off The other setting you need to adjust is the Color White Balance which must be set using the control buttons in the Manual section of my application. Click the center button to bring up the Micro's menu on the screen and then the right button to go to the Micro’s Color menu option. Click the Manual buttons to select WB/ATW and set the R-Y gain and B-Y gain settings to 250. Once set, they will remain at that value until manually changed again (you may want to try 200, etc.) Now clicking on the DSO preset will automatically use the values from your revised DSO Preset file to set the Exposure and Enhance values for stacking in color. 01/10/2015 Update Although the Micro can produce color images using AGC and stacking, I have found I prefer using the Micro the way I have been using it. I start with AGC on high with no stacking to center my target image. Then I turn AGC off and change the setting to x1024 (or less depending on the brightness of the target) to produce a nice detailed color image. It appears that longer exposures without AGC produce more detailed images (so I do not use a modified setDSO.txt file as described above). The new release of the MMEC application now has a preset for Center that enables you to quickly change the settings to center your target. Then you can click on the DSO preset to change it to the best setting for more detail . I usually want to invest the additional 20-30 seconds to try the longer exposure with no ACG to see what additional detail it might reveal. |
AuthorAstronomy was my favorite hobby many years ago, but was gradually set aside due to work, family and life in general. In recent years I resumed my hobby looking forward to using the new technology that is now available. Then I discovered Video Astronomy. Then I learned how to do it Remotely. I wrote some books, and decided to set up this web site to continue to pass on what I learn. Categories
All
|