|
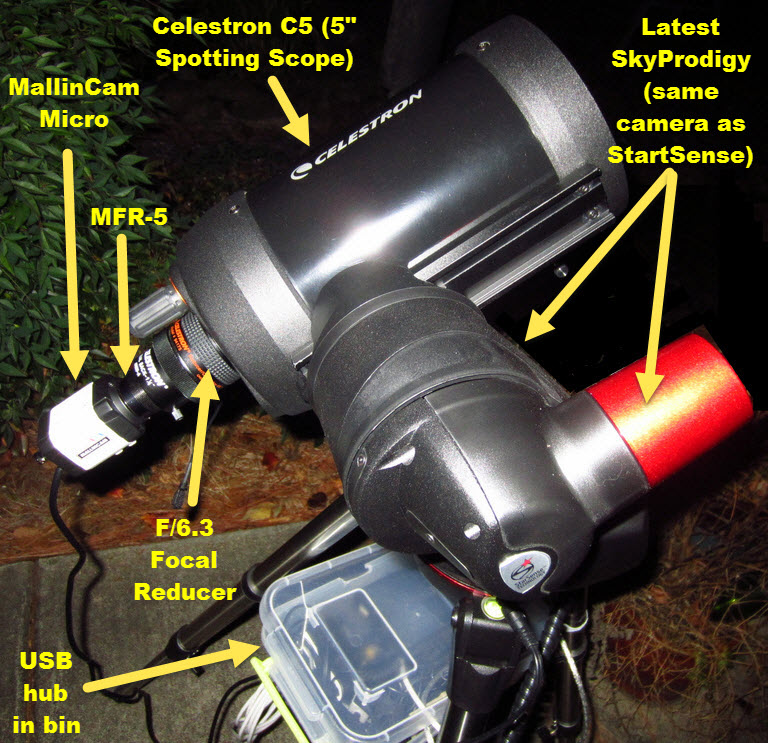
I have found I can use other light weight scopes on my SkyProdigy mount. I can easily use my C5 on my SkyProdigy mount for a nice portable Remote Video Astronomy setup. Since the C5 is a short scope, it can point straight up without worrying about slew limits (I would guess this would be true of the SkyProdigy 6 as well). When changing scopes, I find it is best to recalibrate the SkyProdigy’s camera to improve centering when slewing to an object. This is an intermediate setup beyond what I describe in the Start Simple tab. By using the MallinCam MFR-5 reducer on the Micro and a Celestron F/6.3 reducer on the Scope, the F10 C5 effectively is converted to a faster F3.2 setup for Video Astronomy. Stacking these two focal reducers is pushing the limits a little though (I sometimes remove the F/6.3). Here is a photo of the equipment setup. This makes a lightweight “Grab & GoTo Scope” setup for RVA using the SkyProdigy mount. The Micro video output cable is connected to a small video capture device located inside the plastic bin. The video capture device USB cable along with the Micro camera control USB cable and hand controller USB cable are plugged into a powered USB hub also in the plastic bin attached to the mount’s tray. I keep my scope setup like this inside. To use it, I pick it up and take it outside, power on and start the auto align. While it is aligning, I unroll the hub’s 35 foot active USB cable, pass it through a window (and close the window down to the cable) and connect the USB cable to my laptop inside. By the time the SkyProdigy finishes the alignment (about 3 min) I am ready to begin viewing inside.  Using my Micro Extended Control software, I click on the Focus preset first thing, slew to a bright star and make sure it is still in focus. If not, I go back outside with a battery powered LCD to connect to the camera, put the focus mask on and adjust the focus… and try to remember to remove the focus mask when done 😊. I reconnect the camera video output to the video capture device and return inside. From first picking up this setup to beginning to slew to my first target is about 10-20 min depending on the focus check. Anytime I slew to a new target (from inside), I click the Focus preset and center my target object using the telescope controls in Starry Night on my laptop. Since the Focus preset enables the image to be updated every ½ second, it is a good setting to use when centering target objects like clusters or DSOs. Once centered, I click on the appropriate Preset for the target object for better viewing. Sometimes I also click on Adjustments to fine tune the Exposure and Enhance settings.
0 Comments
Your comment will be posted after it is approved.
Leave a Reply. |
AuthorAstronomy was my favorite hobby many years ago, but was gradually set aside due to work, family and life in general. In recent years I resumed my hobby looking forward to using the new technology that is now available. Then I discovered Video Astronomy. Then I learned how to do it Remotely. I wrote some books, and decided to set up this web site to continue to pass on what I learn. Categories
All
|


 RSS Feed