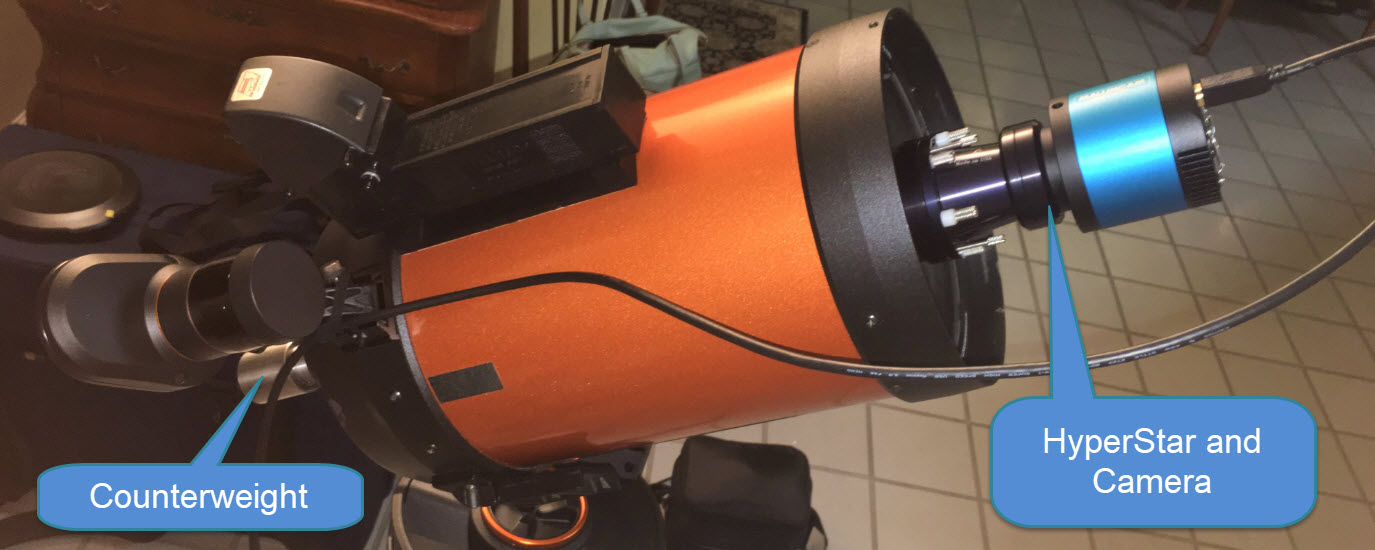
Earlier this year I bought a Starizona HyperStar for my Celestron 8” Schmidt-Cassegrain telescope. The HyperStar focal reducer converts my f/10 telescope to f/2.1 with a wider field of view. To accomplish this feat, the HyperStar replaces the secondary mirror at the upper end of the telescope. The camera is installed onto the HyperStar at the upper end rather than at the lower end of the telescope. A supplied counterweight can be inserted into the lower end where you normally insert an eyepiece in order to counterbalance the HyperStar and camera installed at the other end.
Tell Starizona what camera you plan to use so they can include the proper camera adapter for the HyperStar. The HyperStar comes with good instructions and they have a nice video available showing the setup process. I have included a link to the video at the end of this post.
Once you have gone through the setup and removal process a couple of times, it becomes fairly straightforward to work with. You do always need to pay attention during the process since you are dealing with items that don’t like to be bumped (secondary mirror, correction plate, lens, etc.).
Even though my description and pictures are for an 8” Celestron, the concepts apply to other similar telescopes. I show using it on an Alt-Az mount, which requires using the supplied counterweight. The counterweight is not required if you have a German equatorial mount.
You should read and follow the supplied setup instructions. As I have found in the past though, there are always some areas of instructions that need a little more light for clarity and to avoid that “I’m not sure about this” feeling.
Setup
1. Position the Telescope and attach the Counterweight.
- Always have your telescope aimed partly upward during setup and removal to prevent the secondary mirror or HyperStar lens from accidently falling out during the process. They recommend using about a 45-degree angle.
- If you have an Alt-Az mount, first slide the included counterweight part way into the visual back of the telescope (where you normally would insert a diagonal, eyepiece or camera) and secure it in place.
 | 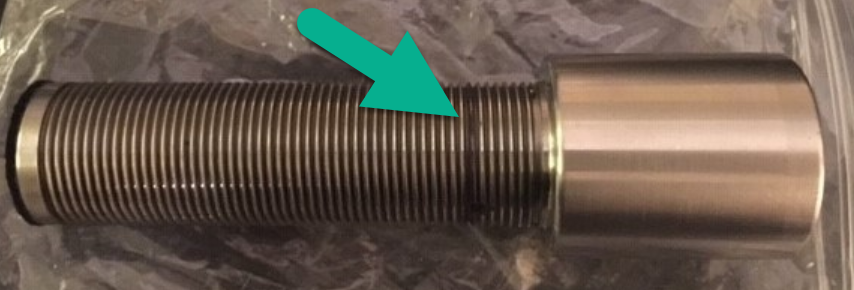 Later when you have positioned the counterweight to properly counter balance your installed HyperStar and Camera, you can mark a ring on the threads of the counterweight with a magic marker to know about how far to insert it in the future during setup. |
2. Remove the Secondary Mirror
- The bottom cap for the HyperStar lens is used to store the secondary mirror once you have removed it from the telescope glass corrector plate. Unthread the bottom cap from the HyperStar lens and have it easily within reach so you can put the secondary mirror into it. So what do you do with the HyperStar lens at this point since there is no cap on the bottom? I always make sure I have a clean level place nearby that I can stand it on (where it won’t be easily bumped over) until I am ready to install it.

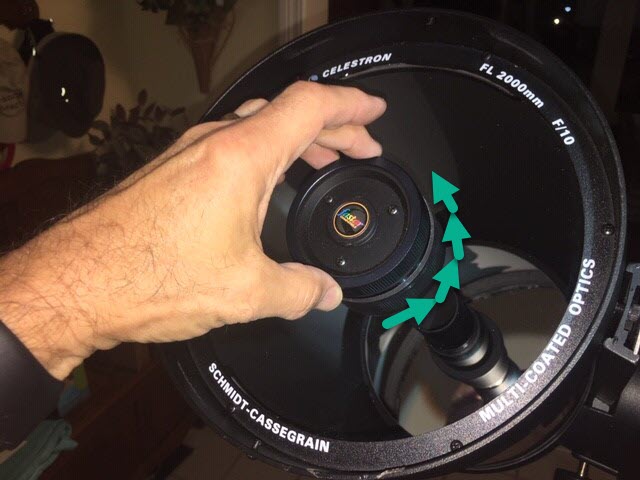
- If you have never removed your secondary mirror before, take a close look at the ring that is screwed onto the top of it. You are going to carefully turn this ring counterclockwise to unscrew just the ring from the secondary mirror holder.
 |  |
- If you see the Secondary Mirror logo began to rotate with the ring instead of the ring unscrewing, then Stop immediately! (If this happens, see “The Secondary Mirror Assembly is turning” section). Once properly removed, set the ring down within easy reach.
- Now carefully grasp the knob on the top center of the secondary mirror and pull the secondary mirror straight out of the telescope, making sure you do not touch the secondary mirror or the telescope glass corrector plate. (If you do, see “I touched the Secondary Mirror or glass Corrector Plate” section).

- Place the secondary mirror assembly straight down into the HyperStar bottom cap you previously set aside which now serves as a storage holder for the secondary mirror.

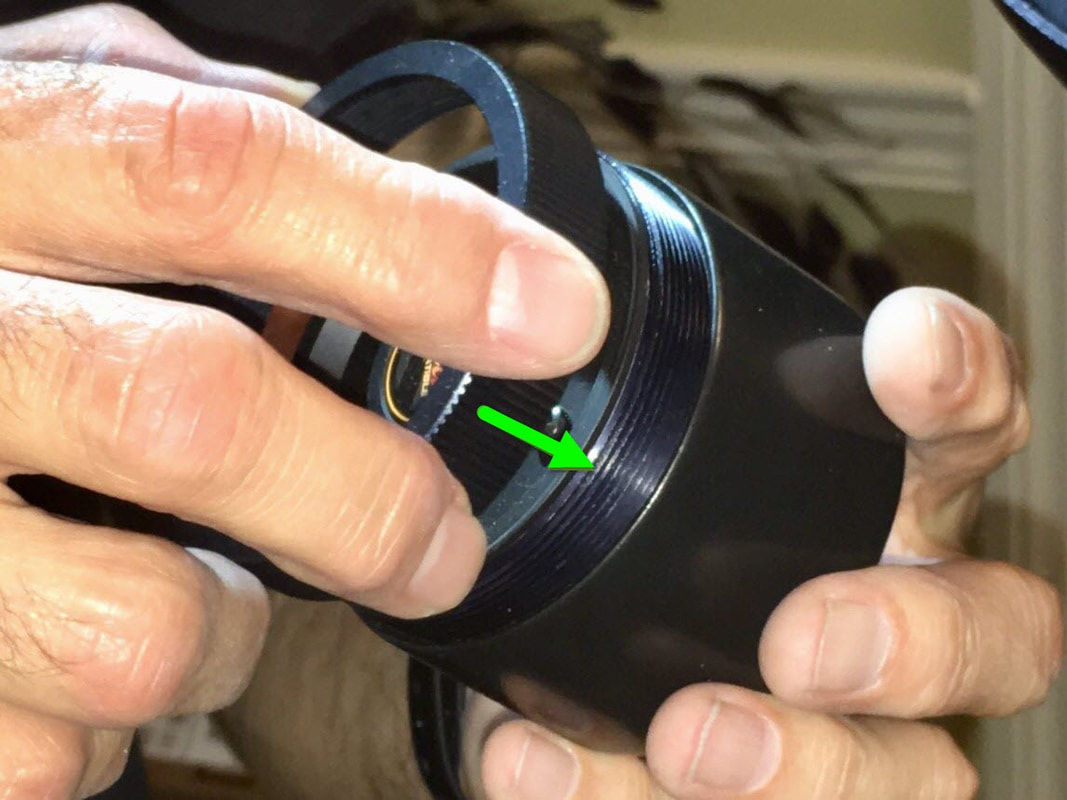
- Be sure to align the little notch on the storage holder with the small rounded screw on the side of the secondary mirror as you slide it into the holder.
- Pick up the retaining ring you removed and screw it over the secondary mirror to lock it into the storage holder and then set it aside.
 |  |
3. Installing the HyperStar lens and your camera
- My HyperStar came with the camera adapter I ordered already attached. If yours came separately, remove the plastic cap from the top narrow end of the HyperStar lens and attach your camera adapter. I store my HyperStar with the camera adapter attached.
- The included instructions describe attaching your camera to the HyperStar before installing the HyperStar onto the telescope. You may have to remove a 1.25” or 2” nosepiece from your camera to thread it into the HyperStar/adapter threads.
- They then note to carefully thread the entire HyperStar and camera assembly into the front of the telescope where the secondary mirror was removed. Do not worry about the camera orientation at this point.
- I prefer reversing the two steps above. I first install the HyperStar with the camera adapter onto the front of the telescope where the secondary mirror was removed. Then I screw my camera onto the HyperStar/adapter.
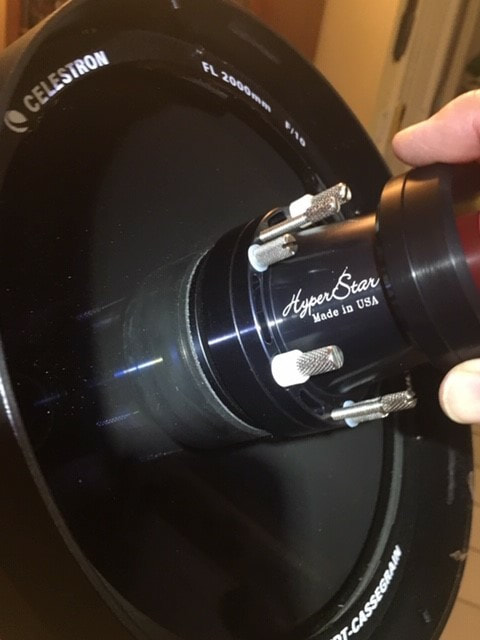 | 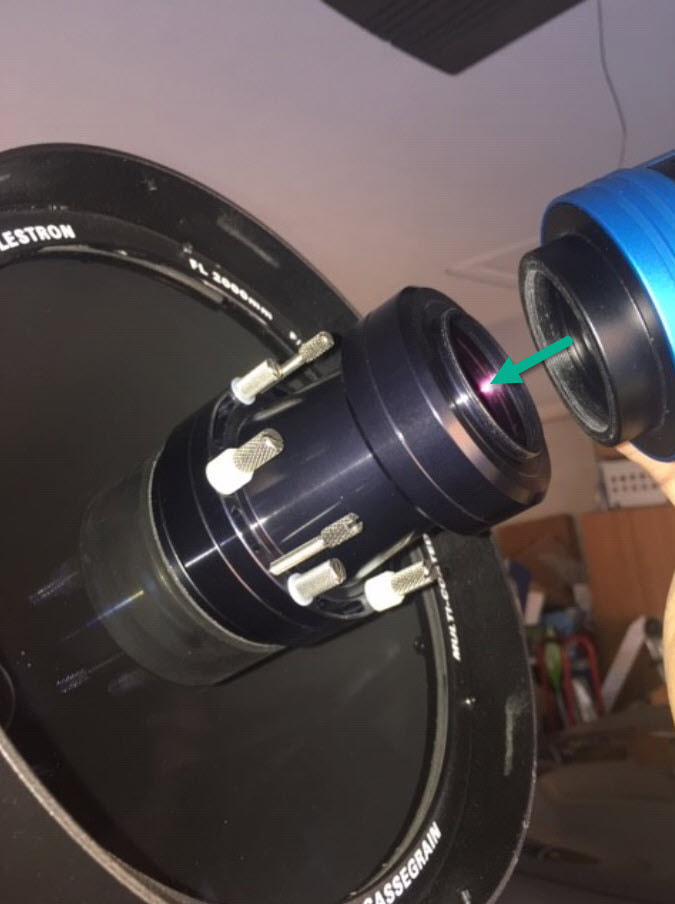 |
Whichever process you use, do not overtighten the HyperStar onto the telescope, so that it can be easily removed later.
4. Balancing the Telescope
- For an Alt-Az mount you will now need to adjust the position of the counterweight until the telescope is balanced (For a German equatorial mount you can usually just move the telescope position on the mount to balance it). Hold the telescope with one hand and loosen the declination clutch (if available). If the front of the telescope moves down, move the counterweight further out. If the front rises, push the counterweight further in. Once the telescope is balanced and stationary without your hand on it, tighten the clutch.
- The next step in their instructions discusses the method for collimating the HyperStar lens if there is any noticeable coma effect in your image (flaring of the star images to one side) on one edge or corner of the field while the rest of the stars appear sharp. However, at this point you do not have your camera connected and aimed at a bright star and focused. So I recommend you skip this step for now and if you see any noticeable coma later, come back to this step and follow their directions to adjust the push/pull screws as needed. Note the tip to only adjust the screws about ¼ turn at a time, and their warning to not loosen the pull screws too much since they hold the lens in place on the telescope.
- You will now want to rotate your camera so it is in the proper orientation. There are three screws with white nylon bushings that can be slightly loosened to allow the camera and lens to be rotated. Once the camera and lens are rotated to the desired orientation, tighten down these 3 screws.

7. Using Filters
- This is something you may want to do before step 3 if you know you plan to use a filter for your viewing session since you need to unthread the top half of the filter adapter from the HyperStar lens in order to thread the filter inside as described. If you want to add or change the filter during a viewing session, you will probably need to unscrew the camera from the adapter and then unthread the top half of the filter adapter to install/change the filter. If you use filters often, you can purchase from Starizona a filter adapter that allows you to easily remove and slide in new filters (it is shown in the installation video).
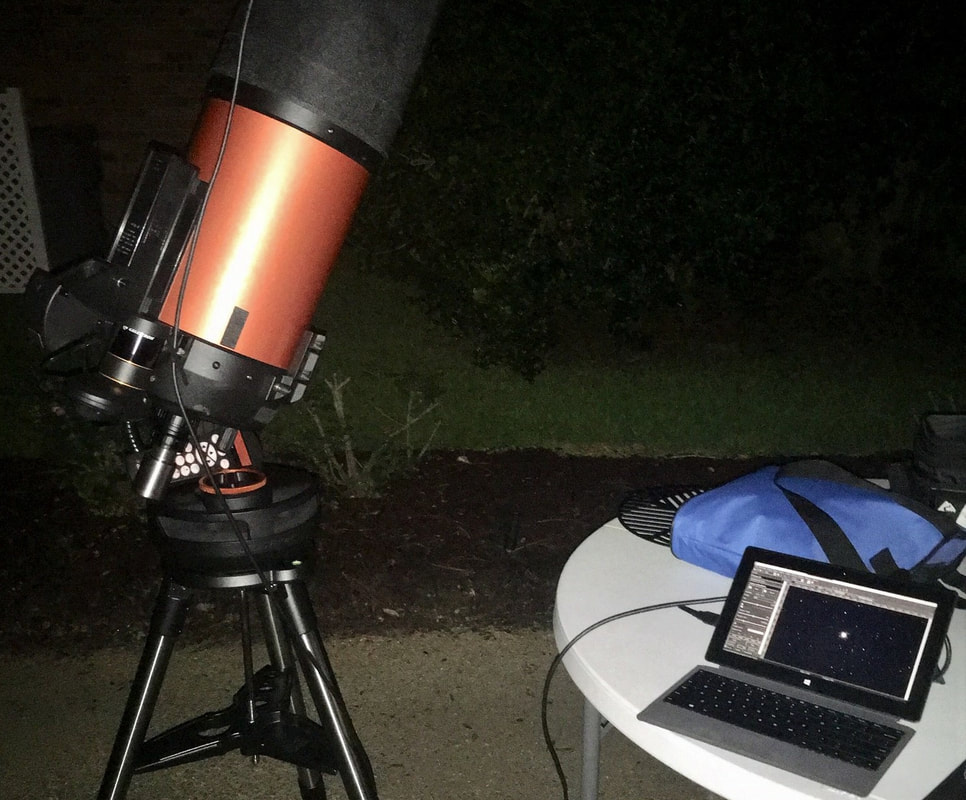
With the HyperStar and your camera in place, you are ready to connect the cable to your camera and computer. I install my dew shield before connecting the cable to the camera. Attach your cabling to your camera and route it back along the side of your telescope and properly secure it in place as noted in a warning on the first page of their instructions. Attention is needed when working around the HyperStar and Camera area since there is a potential for damaging the corrector plate if you are not careful. You definitely want to secure the camera cable well so if anything accidently tugs on the cable, it does not pull on the camera. Here is how I run my cable and secure it to the telescope with a tie.

Now you are ready to power on your mount, perform an alignment and focus on a star.
I usually place a Bahtinov focus mask on the end of my dew shield while focusing (like the one shown on the left below). The mask can be used even with the cable in place.
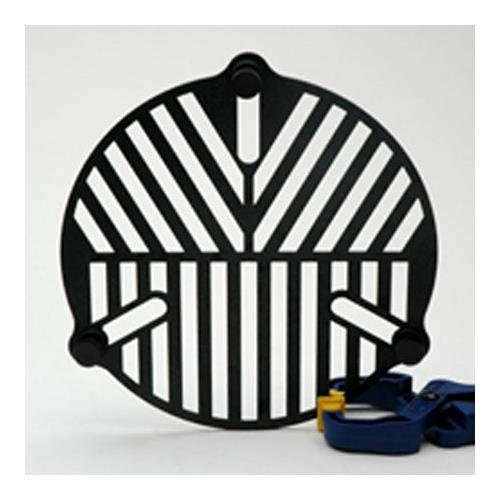 | 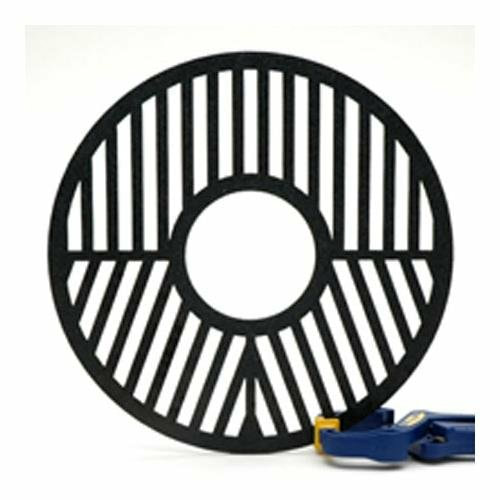 |
If you do not use a dew shield, you can use a special Bahtinov focus mask that has a round opening in the middle (like the one on the right) so it can go down over the HyperStar or Secondary Mirror. Depending on the size of your camera, it may also fit over your camera attached to the HyperStar (it does fit OK over the DS10c). If the mask does not fit over your camera, just use a dew shield and the other mask on the end of the dew shield.
Another reason to use a dew shield and the mask on the left is the cable is not an issue. To use the one on the right you would have to unplug the cable from your camera, slide the mask over the camera and HyperStar and plug the cable back into your camera. After you finish focusing, you will need to unplug the cable from your camera, slide the mask back off over the HyperStar and camera, then plug the cable back into your camera. Or you could cut out a slot in the outer ring and the inner ring of the mask so the cable could be slid into the center opening before putting the mask on and slid out before removing the mask. Or you could do as I do and just use a dew shield and the mask on the left.
After focusing, check your image for any coma effects and if needed, adjust the collimation as described in the instructions.
Packing up
The pack up process is basically a reverse of the setup process. As before, use care when handling the HyperStar, camera and secondary mirror.
1. Begin by disconnecting the cable from your camera and remove the dew shield if used.
2. Position your telescope at about a 45 degree angle.
3. You can unscrew the Camera and HyperStar assembly and remove it from your telescope, and then unscrew the camera from the HyperStar. When you unscrew the HyperStar from the corrector plate, watch closely to make sure it is in fact unscrewing and not rotating the holder it is screwed into.
4. Instead of the sequence in step 3, I prefer to unscrew the Camera from the HyperStar while it is on the telescope and put the Camera away. Then I unscrew the HyperStar from the telescope and set it bottom down on a clean spot and place a cap on the top. Remember to make sure the HyperStar is unscrewing and not rotating the holder it is screwed into.
5. Unscrew the retaining ring from the storage holder containing the secondary mirror and set it nearby.

6. Grasp the knob on the top of the secondary mirror, pull it straight out of the storage holder and set the storage holder down for later use as the bottom cap to go onto the HyperStar. Carefully align the rounded screw on the side of the secondary mirror with the notch of the holder on the corrector plate and slide it straight into the telescope.

7. Pick up the retaining ring and gently screw it into place. Do not overtighten it.

8. Get the HyperStar and the bottom cap that was used as the secondary mirror storage holder and screw it onto the bottom end of the HyperStar. Place the HyperStar into your storage case.
9. Remove the counterweight (if used) from the lower end of your telescope and also place it into your HyperStar storage case.
9. Remove the counterweight (if used) from the lower end of your telescope and also place it into your HyperStar storage case.

The Secondary Mirror Assembly is turning
I had my Celestron 8” telescope for three years before I got my HyperStar. I don’t know if it was due to time, temperature changes or if it was just on very tight, but when trying to remove the secondary mirror from the telescope, I could not unscrew the retaining ring from the Secondary Mirror assembly without the Mirror Assembly trying to turn with it. I noticed the logo on the back of the Secondary Mirror was turning as I tried to unscrew the retaining ring. If you see this happening Stop immediately! If the Mirror Assembly continues to turn, you could be unscrewing the Secondary Mirror Assembly holder from the telescope’s glass corrector plate rather than just unscrewing the retaining ring from the mirror assembly. This is not a good thing to do. It could result in the inside portion of the secondary mirror holder falling down onto your primary mirror.
If you see the Secondary Mirror assembly start to rotate, try grasping the knob on the top center of the Secondary Mirror with one hand to keep it from rotating while unscrewing the retaining ring with the other hand.
In my case, the ring was on too tight to do this by hand. I had to use pliers to hold the knob to keep the Secondary Mirror from rotating while unscrewing the retaining ring. You must be very careful to not let your tool slip and touch your glass corrector plate, so I only provide this picture to try it as a last resort! After did this once, I have not had to use a tool again.

I touched the Secondary Mirror or glass Corrector Plate
I recommend getting a lens pin to have available when needed. If you accidently touch the Secondary Mirror or glass Corrector Plate, you can remove the cap of the pen and lightly use the soft round end to remove smudges.

Links
I admit I was a little apprehensive about getting and using a HyperStar because of the setup process. In spite of the various warnings and cautions, once I used it, I wish I had gotten one sooner! If you take your time learning the setup process, then it becomes easy. Operating at f/2.1 greatly reduces your exposure time, and I love the larger field of view it provides. You can click the following link to see the wide field of view of images with very short exposure times produced using my DS10c with the HyperStar on my Celestron 8”:
remotevideoastronomy.com/blog/ds10c-on-c8-with-hyperstar
Click the link below to see the Starizona HyperStar Installation video:
youtu.be/O9RYy27Ppb0
 RSS Feed